Tóm Tắt
The First Step: Checking that your computer can support Android Studio
First thing’s first: check the system requirements for Android Studio to make sure it can run properly on your computer. Missing one of the requirements can lead to many of the problems below, so please go through this step before moving on! Here are the steps for checking some of the metrics on the system requirements page:
Windows
RAM: Read this article to learn how to check your RAM.
Mac OS X
Operating System: Click the apple icon in the top left corner of your screen. In the dropdown menu, select “About This Mac”. The popup window should say what version you have near the top (10.x.x).
Screen Resolution: Click the apple icon in the top left corner of your screen. In the dropdown menu, select “About This Mac”. At the top of the popup window, “Overview” should be selected. Click “Displays” instead, and the screen resolution should be next to the screen size.
I can’t finish installing Android Studio
I have a Mac and a Standard Installation fails just before completion
If you’re on a Mac, you may have trouble getting Android Studio to finish installing. It may throw a bunch of errors just as it’s about to complete a standard installation. If you run into this problem, you should try running a custom installation instead. You can leave all of the settings as they are and it should complete installation with no problem.
I can’t see the Preview Windows (The windows that shows the phone screen in Android Studio)
Are you having trouble finding the Preview Window?
- Make sure you’re looking at a
.xml
file. The preview windows is only for layout files which have the .xml extension.
- Then click the
Preview
button on the right side of the screen.
Does the Preview Window show errors that prevent it from displaying a phone?
I see an error that says “The following classes could not be instantiated…”
You might have encountered an error that looks like this:

-
Update Android Studio
. Go to the starting screen by closing your projects. Then click “Check for updates now”:
Then select click “Update and Restart”
- Change to
API 22.
3. Run your app once by pressing the green run button.
4. You should see this window. Just hit Cancel. Once everything is working, you’ll actually run your app, but right now, you’re solving a bug with Android Studio:
Now it should work:

The preview window has “Rendering Problems” and there’s a “Gradle Build” error in the console (aidl is missing)
To fix this error, right-click on the “app” folder in the leftmost panel (as shown below) and select “Open Module Settings”.
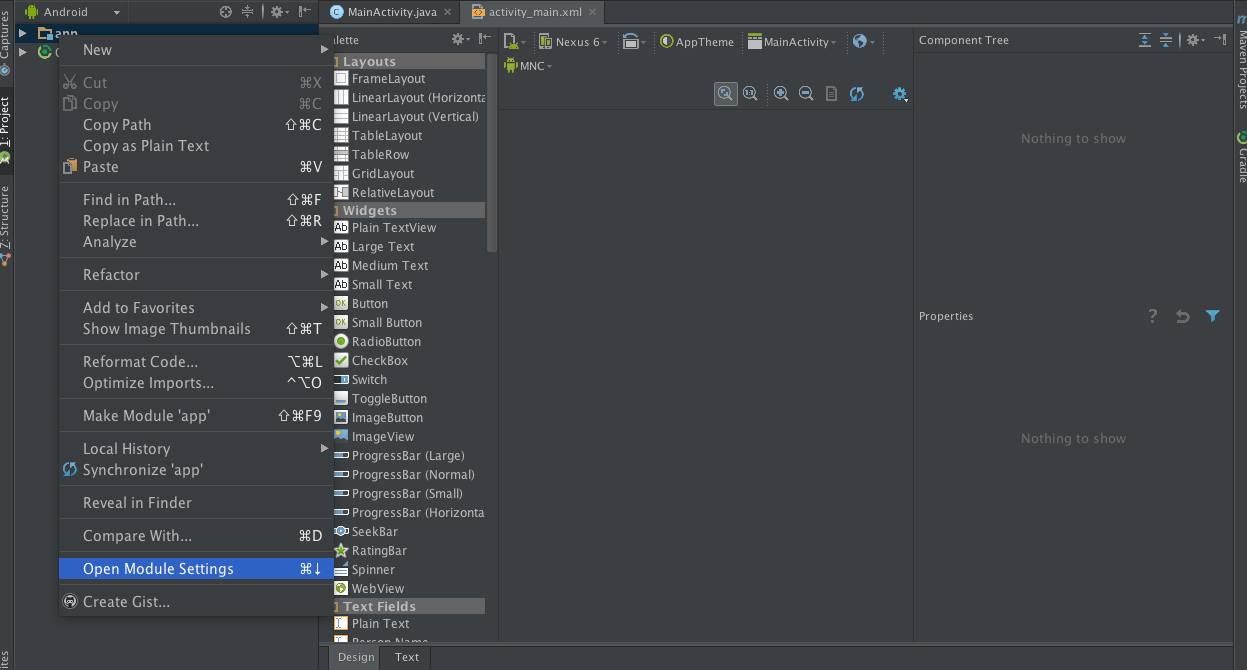
Once you’ve done that, you should see a box titled “Project Structure” pop up. Make sure “Compile SDK Version” is set to “API 22: Android 5.1 (Lollipop)”. Change the section titled “Build Tools Version” to “22.0.1” if necessary (it might be set to “23.0.0 rc1”).

If there’s a new “Rendering Problem” that says “Rendering failed with a known bug. Please try a rebuild.”, just click the word “rebuild”. Wait a minute for the Gradle rebuild, then your problem should go away. If you get a “Rendering Problem”, such as the “The following classes could not be instantiated:” one, make sure the API in the design view is set to “API 22” (if it’s already set there, just click on it again). Make sure “Automatically Pick Best” isn’t selected.
I can’t start my app on my phone
- Have you enabled Developer Options and turned on USB Debugging as instructed in the video
- Try unplugging and replugging in both your phone and the usb cable to your computer.
- Try a different USB cable.
- Do you see this message on your phone?

If so, select “Always allow from this computer” and press “OK”.
- Are you on a Windows computer? You might have not downloaded the correct driver
I can’t start the emulator
The emulator shows, but it stays black or on the android loading screen.
Please look at the error log window. Make sure to click 4: Run if it is not pressed (See the red circle below).
What error do you see?
HAX is not working and emulator runs in emulation mode emulator: The memory needed by this VM exceeds the driver limit.

It means that your machine is not fast enough to run the default emulator. Not to worry. Start by closing the non-functional emulator window. Open the AVD Manager.

Find the virtual device in question and click the pencil which is the edit button.
Go to the Advanced Settings.
Find the RAM and lower it. How low will depend on your device. If you had 1536 MB RAM, try 1024 MB. You will need to scroll down on the screen.
The value 1024 MB will automatically change to 1 GB. Click finish, let the emulator update and try starting the emulator again by clicking the green run button and selecting the emulator from theLaunch emulator portion of the dialog.

x86 emulation currently requires hardware acceleration! Please ensure Intel HAXM is properly installed and usable.
This could mean a couple things. First, you need to make sure HAXM is installed. To do this, go to Configure then SDK Manager.


Scroll down to the bottom and confirm that next to HAXM it says it’s installed:

If not, click the checkbox and then click “Install 1 Packages”.

If you get the error “VT not supported” during the installation disable Hyper-V on windows features. You can execute this command dism.exe /Online /Disable-Feature:Microsoft-Hyper-V. You will also need “Virtualization Technology” to be enabled on your BIOS
After you’ve done this a manual install is needed:
Navigate to your SDK /YOUR_SDK_PATH/extras/intel/Hardware_Accelerated_Execution_Manager/
On Mac’s the SDK is usually in Library/Android/
On Windows C:\Users\[account]\AppData\Local\Android\sdk
On Mac
Run and install the .mpgk in the following .dmg
- Yosemite: IntelHAXM_1.1.0_for_10.10.dmg
- Pre-yosemite: IntelHAXM_1.1.0_below_10.10.dmg
My version of Android Studio has different Activity templates than what is shown in the classroom videos.
Android Studio version 1.4 or newer uses a new set of Activity templates. If you are using this version or newer, please select the Empty activity (instead of Blank Activity) template which will configure your new project to match the content in the classroom videos.
Share this:
Like this:
Like
Loading…