Tóm Tắt
Broadcast Intent
Một dạng khác của Intent, gọi là Broadcast Intent, là một hệ thống Intent được gởi đến tất cả các ứng dụng đã đăng ký Broadcast Receiver. Ví dụ, hệ thống Android sẽ gởi các Broadcast Intent để xác định sự thay đổi trạng thái của thiết bị như khởi động, kết nối nguồn, bật/tắt màn hình, v.v.
Các đối tượng broadcast intent gửi các thông điệp bằng cách dùng các phương thức sendBroadcast(), sendStickyBroadcast(), hay sendOrderedBroadcast() của lớp Activity. Khi một broadcast intent được tạo, nó phải chứa một chuỗi xác định sự kiện broadcast còn gọi là action string. Chuỗi này là duy nhất và dùng cú pháp giống tên gói của ứng dụng. Phương thức thiết lập action string cho intent là setAction() như đoạn mã minh họa sau:
Intent intent = new Intent();
intent.setAction("com.example.Broadcast");
intent.putExtra("MyData", 1000);
sendBroadcast(intent);
Broadcast Receiver
Broadcasd Receiver là cơ chế cho phép một ứng dụng có thể hồi đáp đến Broadcast Intent. Trước đó, ứng dụng phải được đăng ký đến bộ lọc Intent (Intent Filter) kiểu IntentFilter. Đoạn mã sau minh họa broadcast receiver:
IntentFilter filter = new IntentFilter("com.example.Broadcast");

MyReceiver receiver = new MyReceiver();

registerReceiver(receiver, filter);
Bây giờ chúng ta sẽ tìm hiểu chi tiết hơn về broadcast intent và broadcast receiver qua ứng dụng minh họa sau đây.
Ứng dụng sử dụng Broadcast Intent và Broadcast Receiver
Tạo ứng dụng
Tạo một ứng dụng mới tên SendBroadcast, nhập ngocminhtran.com trong Company Domain, chọn Phone and Tablet và API 14, chọn Empty Activity và nhập tên SendBroadcastActivity trong Activity Name và activity_send_broadcast tương ứng trong Layout Name.
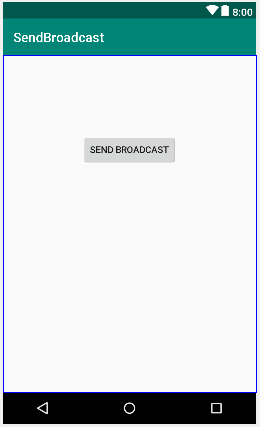
Mở tập tin activity_send_broadcast.xml trong chế độ Design, xóa TextView “Hello World!” mặc định, thêm một Button với giá trị thuộc tính ID và Text lần lượt là:
View
ID
Text
Button
button
Send Broadcast
Định vị Button trên giao diện như sau:
Tạo và gửi Broadcast Intent
Mở tập tin SendBroadcastActivity.java và thêm phương thức sendBroadcastIntent() đến lớp SendBroadcastActivity để tạo và gửi một đối tượng broadcast intent:
public class SendBroadcastActivity extends AppCompatActivity {

   @Override
   protected void onCreate(Bundle savedInstanceState) {
     super.onCreate(savedInstanceState);
     setContentView(R.layout.activity_send_broadcast);
   }
   public void broadcastIntent(View view)
   {
     Intent intent = new Intent();
     intent.setAction("com.ngocminhtran.sendbroadcast");

    //cho phép intent bắt đầu một thành phần
    //của ứng dụng trong trạng thái dừng

     intent.addFlags(Intent.FLAG_INCLUDE_STOPPED_PACKAGES);
     sendBroadcast(intent);
   }
}
Cần import:
import android.content.Intent;
import android.view.View;
Tạo một Broadcast Receiver
Để tạo một broadcast receiver, chúng ta cần tạo một lớp mới là con của lớp BroadcastReceiver theo các bước sau:
- Trong thư mục app > java tìm đến nhấn chuột phải vào tên gói trong thư mục này chọn New > Other > Broadcast Receiver:
- Chấp nhận mặc định tên lớp là MyReceiver (trong Class Name) và các tùy chọn khác

- Nhấn Finish sẽ đến tập tin java chứa lớp MyReceiver có nội dung sau:
package com.ngocminhtran.sendbroadcast;

import android.content.BroadcastReceiver;
import android.content.Context;
import android.content.Intent;

public class MyReceiver extends BroadcastReceiver {

    @Override
    public void onReceive(Context context, Intent intent) {
       // TODO: This method is called when the BroadcastReceiver is receiving
      // an Intent broadcast.
      throw new UnsupportedOperationException("Not yet implemented");
    }
}
- Xóa tất cả nội dung bên trong phương thức onReceiver() và thêm đoạn mã mới như sau:
@Override
public void onReceive(Context context, Intent intent) {
   Toast.makeText(context, "Broadcast Intent Detected.",
   Toast.LENGTH_LONG).show();
}
Cần import:
import android.content.BroadcastReceiver;
import android.content.Context;
import android.content.Intent;
import android.widget.Toast;
Sau khi tạo lớp broadcast receiver chúng ta sẽ đăng ký broadcast intent đến lớp broadcast receiver này.
Đăng ký Broadcast Receiver
Chúng ta sẽ đăng ký broadcast intent đến lớp broadcast receiver này thông qua đối tượng IntentFilter bằng cách mở tập tin SendBroadcastActivity.java và thêm một biến kiểu BroadcastReceiver và phương thức configureReceiver() như sau:
public class SendBroadcastActivity extends AppCompatActivity {

   BroadcastReceiver receiver;

   @Override
   protected void onCreate(Bundle savedInstanceState) {
      super.onCreate(savedInstanceState);
      setContentView(R.layout.activity_send_broadcast);
   }
   public void broadcastIntent(View view)
   {
      Intent intent = new Intent();
      intent.setAction("com.ngocminhtran.sendbroadcast");
      intent.addFlags(Intent.FLAG_INCLUDE_STOPPED_PACKAGES);
      sendBroadcast(intent);
   }
   private void configureReceiver() {
      IntentFilter filter = new IntentFilter();
      filter.addAction("com.ngocminhtran.sendbroadcast");
      receiver = new MyReceiver();
      registerReceiver(receiver, filter);
   }
}
Cần import:
import android.content.BroadcastReceiver;
import android.content.IntentFilter;
Cuối cùng là gọi phương thức configureReceiver() trong phương thức onCreate():
@Override
protected void onCreate(Bundle savedInstanceState) {
   super.onCreate(savedInstanceState);
   setContentView(R.layout.activity_send_broadcast);
   configureReceiver();
}
Trước khi thực thi ứng dụng chúng ta mở tập tin activity_send_broadcast.xml trong chế độ Text, tìm đến phần tử <Button> và thêm thuộc tính onClick để gọi phương thức broadcastIntent() khi người dùng nhấn chuột vào Button SEND BROADCAST
<Button
    android:id="@+id/button"
    android:text="Send Broadcast"
    android:onClick="broadcastIntent"
    ...
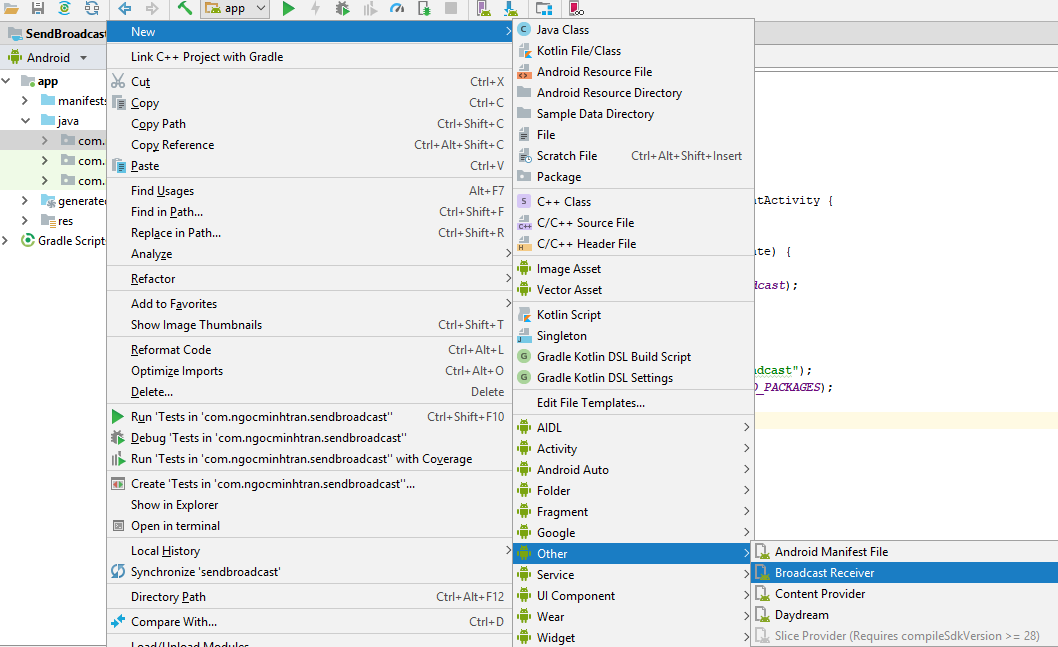
Thực thi ứng dụng và nhấn nút SEND BROADCAST sẽ xuất hiện thông điệp Broadcast Intent Detected trong vài giây trước khi biến mất:
Hủy đăng ký đến broadcast receiver
Chúng ta có thể đăng ký một broadcast intent đến broadcast receiver và đồng thời chúng ta cũng có thể hủy đăng ký đến broadcast receiver bằng cách thêm phương thức onDestroy() đến lớp SendBroadcastActivity như sau:
public class SendBroadcastActivity extends AppCompatActivity {

   BroadcastReceiver receiver;

   @Override
   protected void onCreate(Bundle savedInstanceState) {
    ...

   }
   public void broadcastIntent(View view)
   {
     ...

   }
   private void configureReceiver() {

     ...

   }

   @Override
   protected void onDestroy() {
     super.onDestroy();
     unregisterReceiver(receiver);
   }
}
Xử lý khi nguồn bị ngắt kết nối
Khi chúng ta thực hiện gửi thông điệp bằng broadcast intent, có thể xảy ra trường hợp nguồn bên ngoài bị ngắt kết nối từ thiết bị. Để đề phòng trường hợp này, chúng ta thêm ACTION_POWER_DISCONNECTED đến bộ lọc intent bằng phương thức addAction() trong phương thức configureReceiver() như sau:
private void configureReceiver() {
    IntentFilter filter = new IntentFilter();
    filter.addAction("com.ngocminhtran.sendbroadcast");
    filter.addAction("android.intent.action.ACTION_POWER_DISCONNECTED");
    receiver = new MyReceiver();
    registerReceiver(receiver, filter);
}
Thay đổi một ít nội dung trong phương thức onReceiver() trong lớp MyReceiver (tập tin MyReceiver.java):
public class MyReceiver extends BroadcastReceiver {

   @Override
   public void onReceive(Context context, Intent intent) {
     String message = "Broadcast intent detected "
             + intent.getAction();
     Toast.makeText(context, message,
     Toast.LENGTH_LONG).show();
   }
}
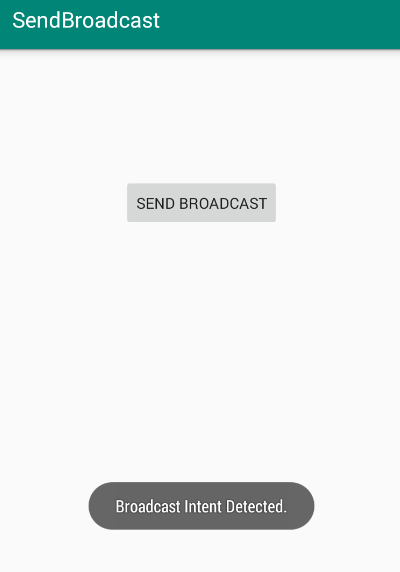
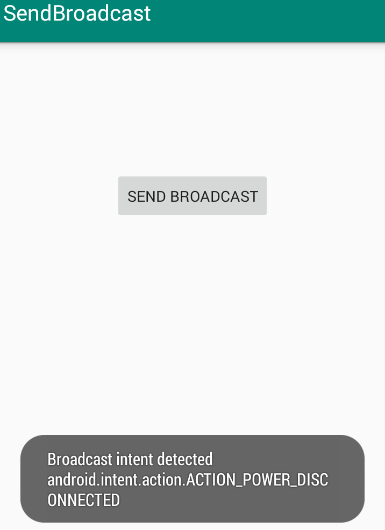
Chạy ứng dụng và nhấn nút SEND BROADCAST sẽ hiện thông điệp như sau:
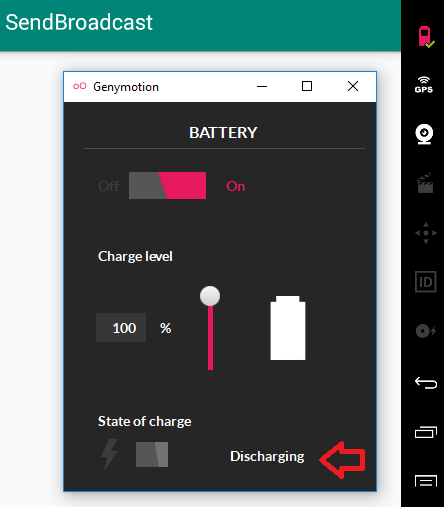
Nếu chúng ta chạy trên máy ảo AVD thì mở rộng các điều khiển trên màn hình và tìm đến tùy chọn Battery và thay đổi Charger connection đến None. Nếu chúng ta chạy trên máy ảo GennyMotion thì tìm đến biểu tượng Battery và thay đổi từ
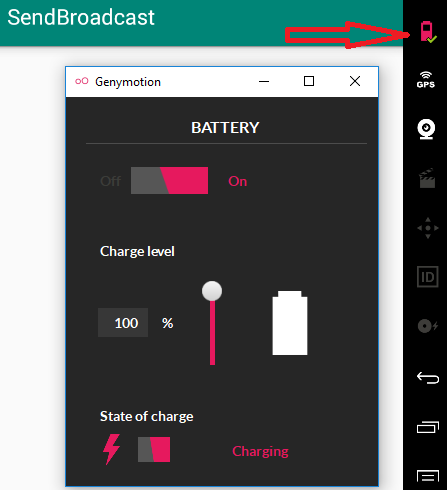
thành
Một thông điệp khác sẽ xuất hiện:
Lời kết
Trong bài này chúng ta đã tìm hiểu cách tạo và gửi đối tượng broadcast intent bằng cách đăng ký đến đối tượng broadcast receiver thông qua đối tượng lọc IntentFilter. Mã nguồn hoàn chỉnh các tập tin của ứng dụng SendBroadcast có thể xem tại GitHub.
Xem thêm
Chia sẻ:
Thích bài này:
Thích
Đang tải…