Sử dụng http service trong angular để tương tác với server nhằm mục đích request lấy tài nguyên hay các thao tác phía server. Service http rất dễ dùng. Với nó, bạn có thể tạo request dạng get, post, put, delete để phục vụ cho nhiều mục đích khác nhau.
Tóm Tắt
Import http service vào project
Để dùng được service, bạn import nó vào project của mình. Bằng cách khai báo trong file app.modules.ts
//app.module.ts
import { NgModule } from '@angular/core';
import { BrowserModule } from '@angular/platform-browser';
import { AppRoutingModule } from './app-routing.module';
import { AppComponent } from './app.component';
import { HttpClientModule} from '@angular/common/http';
@NgModule({
  declarations: [ AppComponent],
  imports: [
    BrowserModule,
    AppRoutingModule,
    HttpClientModule
  ],
  providers: [],
  bootstrap: [AppComponent]
})
export class AppModule { }
Bài hướng dẫn này hướng dẫn cách sử dụng http service trong angular, và trước khi sử dụng, cần thực hiện 1 chút chuẩn bị nhé
Chuẩn bị
1. Tạo project angular
ng new sudungHttpService --routing --defaultsTạo project kết thúc thì import Http Service như hướng dẫn ở bên trên .
2. Tạo và hiện các component trong project
– Tạo 4 component sau để thực hiện test http service
ng g c loaiSanpham
ng g c sanphamList
ng g c sanphamThem
ng g c sanphamSua
– Mở app.component.html , xóa hết code và nhập lại
<!--app.component.html-->
<h4>Loại sản phẩm: </h4>
<app-loai-sanpham></app-loai-sanpham>
<hr>
<h4>Danh sách sản phẩm</h4>
<app-sanpham-list></app-sanpham-list>
<hr>
<h4>Chỉnh sửa sản phẩm: </h4>
<app-sanpham-sua></app-sanpham-sua>
<hr>
<h4>Thêm sản phẩm :</h4>
<app-sanpham-them></app-sanpham-them>
Xong thì chạy project: ng serve –o

3. Tạo service
Chạy lệnh ng g s duLieu để tạo service, chút nữa sẽ triển khai các hàm lấy dữ liệu từ server ở trong service này.
4. Chuẩn bị phía server
a. Cài đặt json server
Tại json-server để chuẩn bị 1 server, vào command line chạy lệnh npm install json-server
b. Tạo file dữ liệu db.json
Nên tạo file db.json này trong folder project của bạn để dễ quản lý. Tạo xong thì nhập nội dung cho nó để tạo các bảng sanpham, loaisp
{
 "sanpham":[
 {  "id":1, "tensp":"Xiaomi Redmi Note 11", "giasp":"5490000",
    "mota":"Xiaomi Redmi Note 11 được xem như chiếc smartphone có giá tầm trung ấn tượng, với 1 cấu hình mạnh, cụm camera xịn sò, pin khỏe, sạc nhanh mà giá lại rất phải chăng.",
    "hinh":"https://cdn.tgdd.vn/Products/Images/42/245261/Xiaomi-redmi-note-11-blue-600x600.jpg",
    "ngay":"2022-04-01", "idLoai":"1"
 },
 {  "id":2, "tensp":"Phone 13 Pro Max 128GB ", "giasp":"33490000",
    "mota":"Máy thiết kế không mấy đột phá khi so với người tiền nhiệm, màn hình siêu đẹp, tần số quét nâng cấp lên 120 Hz mượt mà, cảm biến camera có kích thước lớn hơn",
    "hinh":"https://cdn.tgdd.vn/Products/Images/42/230529/iphone-13-pro-max-xanh-la-thumb-600x600.jpg",
    "ngay":"2022-04-02", "idLoai":"1"
 },
 {  "id":3, "tensp":"Vivo Y33s", "giasp":"6990000",
    "mota":"Vivo Y33s thiết kế trẻ trung với màu đen tráng gương và xanh mộng mơ. Phiên bản màu đen được phủ lớp tráng gương sáng bóng, có thể trở thành chiếc gương tiện lợi",
    "hinh":"https://cdn.tgdd.vn/Products/Images/42/249102/Vivo-y33s-yellow-thumb-600x600.jpg",
    "ngay":"2022-04-03", "idLoai":"1"
 },
 {  "id":4, "tensp":"OPPO Reno7 Z 5G", "giasp":"10490000",
    "mota":"Sản phẩm có thiết kế OPPO Glow độc quyền, camera mang hiệu ứng như máy DSLR chuyên nghiệp cùng viền sáng kép, có cấu hình mạnh mẽ và đạt chứng nhận xếp hạng A về độ mượt.",
    "hinh":"https://cdn.tgdd.vn/Products/Images/42/271717/oppo-reno7-z-5g-thumb-1-1-600x600.jpg",
    "ngay":"2022-04-04", "idLoai":"1"
 },
 {  "id":5, "tensp":"Samsung Galaxy A03 3GB", "giasp":"2990000",
    "mota":"Là điện thoại Galaxy A đầu tiên của nhà Samsung trong năm 2022 tại VN. Sản phẩm có giá dễ tiếp cận, camera chính đến 48 MP, pin 5000 mAh thoải mái sử dụng cả ngày.",
    "hinh":"https://cdn.tgdd.vn/Products/Images/42/251856/samsung-galaxy-a03-xanh-thumb-600x600.jpg",
    "ngay":"2022-04-02", "idLoai":"1"
 },
 {  "id":6, "tensp":"Samsung Galaxy A52s 5G 128GB", "giasp":"10990000",
    "mota":"Điện thoại Galaxy A52s 5G là phiên bản nâng cấp của Galaxy A52 5G, với ngoại hình không đổi nhưng được nâng cấp đáng kể về thông số cấu hình bên trong.",
    "hinh":"https://cdn.tgdd.vn/Products/Images/42/247507/samsung-galaxy-a52s-5g-mint-600x600.jpg",
    "ngay":"2022-04-03", "idLoai":"1"
 }
 ],
 "loaisp":[
    {"id":1, "tenLoai":"Điện thoại di động", "soSP":190},
    {"id":2, "tenLoai":"Laptop", "soSP":178},
    {"id":3, "tenLoai":"Đồng hồ đeo tay", "soSP":143},
    {"id":4, "tenLoai":"Gia dụng", "soSP":781},
    {"id":5, "tenLoai":"Đồ điện", "soSP":351}
 ],
 "profile": { "name": "typicode" }
}
c. Chạy json-server
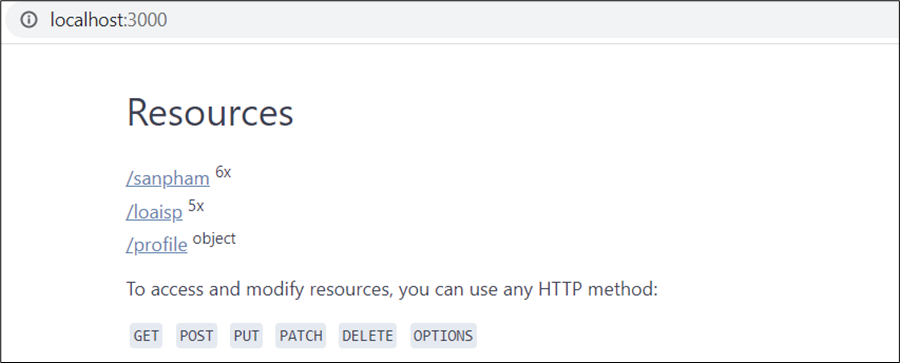
json-server --w db.jsonMở trình duyệt và gõ http://localhost:3000, thấy màn hình như bên dưới là OK. Lúc này máy của bạn đã có 1 server data chạy ở port 3000. Có cái để mà http service request tới.
A. Sử dụng http service trong angular với hàm get
Đâu tiên, hãy thực tập một việc đơn giản: sử dụng http service trong angular để lấy dữ liệu loaisp từ server về hiện ra view. Thực hiện như sau:
1. Import HttpClient vào component và tạo đối tượng HttpClient
//loai-sanpham.component.ts
import { Component, OnInit } from '@angular/core';
import { HttpClient } from '@angular/common/http';
@Component({
  selector: 'app-loai-sanpham',
  templateUrl: './loai-sanpham.component.html',
  styleUrls: ['./loai-sanpham.component.css']
})
export class LoaiSanphamComponent implements OnInit {
  constructor(private _http:HttpClient) { }
  ngOnInit(): void {}
}
2. Tạo request đến server lấy dữ liệu
Sử dụng hàm get() của HttpClient để request đến server. Khi dữ liệu về tới thì hàm subscribe() sẽ đón lấy để xử lý.
//loai-sanpham.component.ts
export class LoaiSanphamComponent implements OnInit {
  constructor(private _http:HttpClient) { }
  listLoai:any;
  ngOnInit(): void {
    this._http.get('http://localhost:3000/loaisp').subscribe(data => {
       this.listLoai=data;
       console.log("Loại sản phẩm: ", data);
     });
  }
}
Xem thử trong console, sẽ lấy dữ liệu loại sản phẩm lấy về

3. Hiện dữ liệu trong component
<!-- loai-sanpham.component.html-->
<p *ngFor="let loai of listLoai; let i= index">
    {{i+1}}. {{loai.tenLoai}}
</p>
Xem kết quả sẽ thấy như hình dưới. Như vậy với hàm get(), của http, bạn tạo 1 request đến server để lấy dữ liệu về client xử lý được rồi đó. Dễ không nào 🙂

B. Tạo request lấy dữ liệu trong service
Mục A phía trên chúng ta sử dụng http service để tạo request lấy dữ liệu từ server. Code đó viết trong component.
Giờ thì cũng mục đích như trên nhưng chúng ta làm hơn xíu, code trong service. Thực hiện như sau:
1. Trong service duLieu đã tạo, code để import và tạo đối tượng httpClient. Sau đó gọi hàm get() của nó lấy lấy danh sách sản phẩm từ server.
//du-lieu-service.ts
import { Injectable } from '@angular/core';
import { HttpClient } from '@angular/common/http';
@Injectable({ providedIn: 'root'})
export class DuLieuService {
  constructor(private h:HttpClient) { }
  getSanPham(){
    return this.h.get('http://localhost:3000/sanpham');
  }
}
2. Code trong class của component để gọi hàm mới định nghĩa trong duLieu service
//sanpham-list.component.ts
import { Component, OnInit } from '@angular/core';
import { DuLieuService } from '../du-lieu.service';
@Component({
  selector: 'app-sanpham-list',
  templateUrl: './sanpham-list.component.html',
  styleUrls: ['./sanpham-list.component.css']
})
export class SanphamListComponent implements OnInit {
  constructor(private d:DuLieuService) { }
  listSanPham:any;
  ngOnInit(): void {
    this.listSanPham = this.d.getSanPham().subscribe (
      data => this.listSanPham= data
    );
  }
}
3. Hiện dữ liệu mới lấy được ra view
<!-- sanpham-list.compoment.html-->
<p *ngFor="let sp of listSanPham">
    {{sp.tensp}} - {{sp.giasp}} - {{sp.ngay}}
</p>
Xem kết quả sẽ thấy list dữ liệu lấy được từ server. Kết quả của chuỗi xử lý: trong component gọi hàm trong service, từ server mới request đến server. Response từ server trả về service, rồi chuyển cho component để hiện ra trong trang.

C. Tạo request để gửi (post) dữ liệu lên server
Hàm get() của httpclient giúp lấy dữ liệu từ server về, còn hàm post() sẽ giúp gửi dữ liệu lên server để lưu. Chúng ta sẽ tạo 1 form thêm sản phẩm, khi user submit, dữ liệu trong form sẽ gửi lên server để lưu. Thực hiện như sau:
1. Nhúng FormsModule vào project
Mở file app.modules.ts, code import FormsModule

2. Nhúng boostrap vào project
Mở src/index.html nhúng css của booststrap vào để định dạng form cho đẹp
<link href="https://cdn.jsdelivr.net/npm/[email protected]/dist/css/bootstrap.min.css" rel="stylesheet">3. Code tạo form thêm sản phẩm
Code sau tạm tạo form thêm sản phẩm với 2 thuộc tính là tensp và giasp, bạn thêm các thuộc tính khác cho đủ (nếu muốn)
<!-- sanpham-them.component.html -->
<form #frmSP="ngForm" class="col-6 m-auto">
    <p><label>Tên SP</label>
       <input name="tensp" ngModel class="form-control" type="text">
    </p>
    <p><label>Giá SP</label>
       <input name="giasp" ngModel class="form-control" type="number">
    </p>
    <p><button type="submit" class="btn btn-success">Thêm SP</button></p>
</form>
Xem thử kết quả:

4. Code xử lý submit thêm sàn phẩm
– Trong tag form, khi sự kiện submit xảy ra , gọi hàm spThem trong class và truyền dữ liệu trong form cho nó
<!-- sanpham-them.compoment.html-->
<form #frmSP="ngForm" class="col-6 m-auto" (ngSubmit)="spthem(frmSP.value)" >
– Trong class của component sanphamThem, định nghĩa hàm spThem
//sanpham-them.component.ts
import { Component, OnInit } from '@angular/core';
import { DuLieuService } from '../du-lieu.service';
@Component({
  selector: 'app-sanpham-them',
  templateUrl: './sanpham-them.component.html',
  styleUrls: ['./sanpham-them.component.css']
})
export class SanphamThemComponent implements OnInit {
  constructor(private d:DuLieuService) { }
  ngOnInit(): void { }
  spthem(sp:any){
    var tensp= sp.tensp;
    var giasp= sp.giasp;
    console.log(tensp, giasp);
    this.d.themSanPham(sp).subscribe ( data => alert('Thêm thành công'));
  }
}
5. Định nghĩa hàm trong service để gửi dữ liệu lên server
Để gửi dữ liệu lên server, bạn dùng hàm post() của httpClient, thông số đầu là địa chỉ uri của server, thông số 2 là data json sẽ gửi lên
//du-lieu.service.ts
themSanPham(sp:any){
    return this.h.post('http://localhost:3000/sanpham',sp);
}
Test: Trong form thêm, nhập rồi nhắp submit, sẽ thấy thông báo thành công. Trên server cũng có thêm dòng dữ liệu mới.


D. Tạo request để xóa (delete) dữ liệu phía server
Ngoài hàm get(), post() như vừa dùng, đối tượng httpClient cũng có hàm delete() , hàm này dùng để tạo request xóa tài nguyên phía server.
1. Trong service, định nghĩa hàm để request lên server như sau
xoaSanPham(id:number){
    return this.h.delete('http://localhost:3000/sanpham/'+ id)
}
2. Trong component class, gọi tới hàm trong service
//sanpham-list.component.ts
xoaSP(id:number){
    if (confirm('Xóa thật không')==true){
      this.d.xoaSanPham(id).subscribe(data => alert('Xóa thành công'))
    }
}
3. Trong view gọi hàm xaaSP trong class
//sanpham-list.component.html
<p *ngFor="let sp of listSanPham">
    {{sp.tensp}} - {{sp.giasp}} - {{sp.ngay}}
    <a href="#" (click)="xoaSP(sp.id)">Xóa</a>
</p>
Test bằng cách nhắp link Xóa trong sản phẩm list, sản phẩm sẽ bị xóa phía serber. Nếu không được thì mua máy mới 🙂
E. Tạo request để sửa (put) dữ liệu phía server
Để cập nhật 1 record trên server , bạn sẽ dùng hàm put() của httpClient. Chúng ta sẽ thử sử dụng trong chức năng sửa sản phẩm. Thực hiện như sau:
1. Tạo form sửa sản phẩm
Trong component view sửa sản phẩm, code tạo form + bind các control vào object sp, khi sự kiện submit sẽ gọi hàm spSua
<!-- sanpham-sua.component.html-->
<form #frmSuaSP="ngForm" (ngSubmit)="spSua(frmSuaSP.value)" class="col-6 m-auto" >
 <p><label>id SP</label>
    <input name="id" [(ngModel)]="sp.id" readonly class="form-control" type="text">
 </p>
 <p><label>Tên SP</label>
    <input name="tensp" [(ngModel)]="sp.tensp" class="form-control" type="text">
 </p>
 <p><label>Giá SP</label>
   <input name="giasp" [(ngModel)]="sp.giasp" class="form-control" type="number">
 </p>
 <p><button type="submit" class="btn btn-success">Sửa SP</button></p>
</form>
2. Code trong compoment class gọi hàm sửa trong service
Trong component sửa sản phẩm, bạn khai báo 1 đối tượng sp. Biến sp này được bind với các control trong form, và giá trị khởi đầu của nó sẽ nhận từ component cha app thông qua @Input
Cũng trong component sửa sản phẩm, bạn định nghĩa 1 hàm suaSP để gọi trong sự kiện submit của form. Hàm suaSP này sẽ gọi tới hàm suaSanPham trong service để request lên server cập nhật sữ liệu trên đó.
//sanpham-sua.component.ts
import { Component, OnInit } from '@angular/core';
import { DuLieuService } from '../du-lieu.service';
import { Input } from '@angular/core';
@Component({
  selector: 'app-sanpham-sua',
  templateUrl: './sanpham-sua.component.html',
  styleUrls: ['./sanpham-sua.component.css']
})
export class SanphamSuaComponent implements OnInit {
  constructor(private d:DuLieuService) { }
  ngOnInit(): void { }
  @Input() sp:any;
  spSua(sp:any){
    this.d.suaSanPham(sp).subscribe ( data => {
      alert('Sửa thành công');
      console.log("Sửa",data);
    });
}
}
3. Định nghĩa hàm sửa sản phẩm trong service
//du-lieu-service.ts
suaSanPham(sp:any){
  return this.h.put('http://localhost:3000/sanpham/' + sp.id ,sp);
}
4. Truyền dữ liệu cho component sửa từ component cha app
Component sửa sản phẩm sẽ nhận giá trị sản phẩm từ cha nó là app. Bởi vậy trong app.component.html,bạn sửa code nhúng app-sanpham-sua như sau:
<app-sanpham-sua [sp]="sp"></app-sanpham-sua>Trong app.component.ts, bạn định nghỉa biến sp và hàm gán giá trị cho sp
sp:any;
ganSP(sp:any){
  this.sp=sp;
  console.log(this.sp);
}
5. Component cha app nhận sản phẩm cần sửa trong sản phẩm list
Trong app.component.html, sửa code nhúng sản phẩm list như code dưới. Mục đích là khai báo sự kiện chonSP gọi hàm ganSP ghi nhận sản phẩm đang chọn
<app-sanpham-list (chonSP) ="ganSP($event)"></app-sanpham-list> 6. Bắn sản phẩm trong compoent sanpham-list ra component cha app
– Trong sanpham-list.component.html định nghĩa link Sửa để gọi hàm suaSP
<!-- sanpham-list.component.html-->
<p *ngFor="let sp of listSanPham">
{{sp.tensp}} - {{sp.giasp}} - {{sp.ngay}}
<a href="#" (click)="suaSP(sp)">Sửa</a>
<a href="#" (click)="xoaSP(sp.id)">Xóa</a>
</p>– Trong sanpham-list.component.ts định nghĩa hàm suaSP để bắn sản phẩm đang chọn ra cha
import { Output, EventEmitter } from '@angular/core';

@Output() chonSP = new EventEmitter();
suaSP(sp:any){
  console.log(sp);
  this.chonSP.emit(sp);
}
Phù, cũng mệt chứ hả, sử dụng sử dụng http service trong angular là thế thôi. Import vào, gọi các hàm get(), post(), put(), delete() để request. Gọi trực tiếp trong component thì dễ, trong service thì code thêm xíu.
Về việc truyền tham số giữa các component, bạn có thể xem thêm bài sau để hiểu @Input , @Output nhé: Sử dụng component trong angular. Để tìm hiểu thêm về http service , bạn xem thêm link này : https://angular.io/guide/http