Tóm Tắt
How to Zoom & Navigate Images in Photoshop

Zooming in Photoshop is a critical function to learn and utilize when you want to make detailed and precise edits while still maintaining a fast workflow.
This tutorial will show you the various ways to zoom in and out in Photoshop, including multiple zoom functions, keyboard shortcuts, and tips that will make your editing and retouching work more efficient and accurate.
So, keep reading to get to know the Zoom feature in Photoshop and how it can help you:

How to Identify the Current Zoom Percentage
Finding the current zoom percentage is easy. As soon as you open an image in Photoshop, you can see the current zoom percentage in the tab information at the top of the document and also on the bottom left of the screen.
- At the top, in addition to the zoom level, you will find the file name, the color space, and bit depth. You can identify the zoom because it’s the one expressed in percentage.
- At the bottom of the document, you will find the zoom percentage, followed by the resolution size and PPI (pixels per inch).

The maximum level you can zoom IN is 12,800%, and the most you can zoom OUT is 0.292%. When you reach high zoom levels, a grid will appear (called a pixel grid) and is only there as a visual reference. It doesn’t print and will disappear once you zoom out again.
How to Zoom In and Out in Photoshop
There are MULTIPLE ways to zoom in or out of your image in Photoshop. The best option to use FOR YOU will depend on your own workflow and which one feels more comfortable.
Here are the most popular options:
1. Input a Zoom Percentage Value
As I mentioned before, in the bottom corner of your document, you will see the zoom level at which the image is currently displayed.
If you click there, you can INPUT A DIFFERENT VALUE, and Photoshop will zoom in or out of the image accordingly. You can do this even if the Zoom tool is not active.
2. Mouse Click
When the Zoom Tool is active, you can simply left-click anywhere on your image, and a few preset zoom options will appear. Choose any of themPhotoshop will zoom in and out to preset values. For example, Fit on Screen, 100%, 200%, and so on. This works the same with a mouse or a touchpad.
To determine whether you need to zoom in or out, select the magnifying glasses on the left of the Options bar or tap the “Z” key. Holding the “ALT” key will temporarily toggle between the zoom in and zoom out options before you click on your image.

3. Keyboard Shortcut
Keyboard shortcuts are a fantastic timesaver. The shortcut for the Zoom Tool is the “Z” key. Click it to activate the tool. You will know when it’s active because your cursor will turn into a magnifying glass.
Once the Zoom Tool is active, the magnifying glass cursor will have a plus sign inside the tool if it’s currently set to “zoom in.” It will have a minus sign if it’s currently set to “zoom-out.”
- The keyboard shortcut to zoom in is “CTRL and +” (PC) or “CMD and +” (Mac).
- The keyboard shortcut to zoom out is “CTRL and -” (PC) or “CMD and -” (Mac).
When using these keyboard shortcuts, Photoshop will zoom in and out in the same increments that it does when clicking on an image with the Zoom Tool active.
4. Mouse Wheel
You can also use your mouse’s scroll wheel to zoom in and out in Photoshop without switching to the Zoom Tool.
To use the mouse wheel to zoom, you must hold the “ALT” key (PC) or “Option” key (MAC) and move the scroll wheel up or down.
5. Touchpad
If you use a touchpad instead of a mouse, you can hold the “ALT” key (PC) or “Option” key (MAC) and swipe two fingers up or down. This works the same way as a mouse’s scroll wheel.
You can also use touchpad gestures to zoom in and out of your image.
- To zoom in, tap with your thumb and index fingers at the center of the pad, then swipe them outwards toward opposite corners.
- To zoom out, make the opposite gesture – start at opposite corners and swipe both fingers towards the center.
6. View Menu
A less convenient way to zoom your picture is from the View dropdown menu. When you click on View, you will find the Zoom In and Out options.
This option is not my favorite because you have to go back and click through the menu EVERY TIME you want to increase or decrease the zoom value.

How to Use the Zoom Tool in Photoshop
On the toolbar, click on one of the magnifying glass icons to enable the Zoom Tool or press “Z” on your keyboard.

Notice there are several Zoom Tool functions listed on the options bar. As I previously mentioned, you can use the Zoom Tool in different ways, and you will find that some of these only work when using the Zoom Tool in specific ways.

Let’s review these options in more detail:
1. Magnifying Glasses
First, you will see two magnifying glasses – one has a plus sign and one has a minus sign. When you click on one of them, you are telling Photoshop that you want to zoom in (“+” sign) or zoom out (“-” sign) every time you click on the image.
Your choice will remain set even if you change to a different tool. This works even when you close Photoshop. Your previous zoom selection will still be active when you relaunch it and go to the Zoom Tool.
2. Resize Window to Fit
The next option is “Resize Window to Fit.” You can enable or disable this option by checking or unchecking the box.
This function does exactly what its name says. When you are working with floating windows (instead of tabs), it will make the window smaller as you zoom out and larger as you zoom in.
Keep in mind that this function only works with keyboard shortcuts. In other words:
- To make your window smaller by zooming out, press the “ALT and -” keys (PC) or “Option and -” keys (MAC).
- To make your window larger by zooming in, press the “ALT and +” keys (PC) or “Option and +” keys (MAC).

3. Zoom All Windows
The next option is “Zoom All Windows.” You can enable or disable this option by checking or unchecking the box next to this option.
When you have multiple images opened in one of the multiple-layout views or multiple floating windows, Zoom All Windows will zoom all the images or floating windows simultaneously. Once you check the box next to this option, hover over and click an image to zoom all the images in or out. The images in all the open windows will zoom at the same amount. You can also hold the “Shift” key while using the zoom tool to get the same result.
This function only works when clicking on an image or window to zoom. It won’t work using touchpad gestures, for example.
4. Scrubby Zoom
The next option is “Scrubby Zoom.” Click the box next to it to enable or disable this option.
When this Scrubby Zoom is enabled, you can:
- Click and drag the cursor to the right to zoom in.
- Click and drag the cursor to the left to zoom out.
This function is enabled by default, but you can turn it off by clicking on the box next to it, to remove the check.

5. 100%
The 100% option is a shortcut button that will quickly display your image at 100% regardless of the zoom level it is currently at. This function will save you time when you want to get back to 100% quickly, instead of zooming in and out in multiple steps.
You can also access the 100% view using the keyboard shortcut “CTRL and 1” keys (PC) or “CMD and 1” keys (MAC).
Note: how much of the image you see when you’re at 100% depends on the image’s resolution.
6. Fit Screen
The “Fit Screen” option is another shortcut button that will change the image display size. When you click the Fit Screen button, Photoshop will automatically zoom in or out to make the LONGEST size of the picture fit the screen.
For example:
- If you’re working with a portrait-oriented picture, the height will fit the screen.
- If you’re image is landscape-oriented, the width will fit the screen.

7. Fill Screen
The “Fill Screen” option is the last shortcut button and will make the image fill the screen entirely.
- If you’re working on a vertical photo, you won’t be able to see a portion of the top and bottom of the picture.
- On a horizontal image, you won’t be able to see a portion of the sides of the picture
Of course, the portion that is cut-off will vary depending on each photo’s aspect ratio.
In either case, Photoshop will zoom to a size where no empty canvas space is showing around the picture.

Zoom Tool (Tips and Tricks)
Aside from Zoom’s traditional uses, here are some helpful tips and tricks that will make your editing even quicker and easier:
1. Continuous Zoom
With the Zoom Tool active, position your cursor wherever you want to zoom in. Then, click and hold the right mouse or touchpad button. Photoshop will begin zooming into the image until you release it – this is called continuous zoom.
If you want to continuously zoom out, hold the “ALT” key (PC) or “Option” key (Mac) plus the right mouse or touchpad button. When you reach the level of zoom that you want, simply let go.
2. Temporary Zoom Tool
Without switching to the Zoom Tool, you can temporarily activate it by holding the “CTRL and Space Bar” (PC) and “CMD and Space Bar” (MAC) on your keyboard. Then simply click on your image.
To switch the direction of the zoom, add the “ALT” key (PC) or “OPTION” key (MAC) to the keyboard combinations discussed above.
For example:
- If the magnifying glass with the plus sign is selected on the Options bar, you can zoom in with “CTRL and Space Bar” (PC) or “CMD and Space Bar” (MAC).
- To zoom out, you need to hold down “CTRL and ALT and Space Bar” (PC) or “CMD and OPTION and Space Bar” (MAC).
3. Zoom Into a Selection
To zoom into a selection, activate the Zoom Tool and disable the Scrubby Zoom from the Options bar. Then click and drag on the area that you want to zoom into.
You will see a dotted-line rectangle forming, similar to the one you see when using the Marquee Tool to make a selection. Once you release the mouse button, Photoshop will zoom into that rectangle area.

Navigating a Zoomed Image
When you are zoomed into an image, a portion of it will be outside your canvas and, therefore, out-of-sight.
So, to navigate to those out-of-sight areas, you need to know how to navigate or move around a zoomed-in image.
There are several ways to do this in Photoshop, so choose the one most comfortable for you. Here are a few options:
1. Scroll Bars
As you zoom into the image, scroll bars will appear on the right and bottom of the workspace. You can click and drag either of these scroll bars to move around your photo.
- Use the scroll bar on the right side to move the image up and down
- Use the scroll bar on the bottom to move the image left and right.

2. Hand Tool
Look for a hand icon on your toolbox – this is the Hand Tool. To activate it, click on the icon or use the keyboard shortcut by pressing = the “H” key. When it’s active, the cursor will change to a hand icon.
When the Hand Tool is active, you can click and drag to navigate around a zoomed-in image. If you release the click WHILE you are still dragging, the image will continue to move in the same direction – as if you had tossed the image like a frisbee.
You can temporarily activate the Hand Tool by pressing the spacebar on your keyboard while using any other tool.
For example, if you are using the Clone Tool to remove a blemish and are zoomed in to do the fine detail work – simply hold down the space bar (the cursor will change to a hand icon), and you can then click and drag to move the image around. Once you let the space bar go, the navigation will stop, and you can continue your retouching.

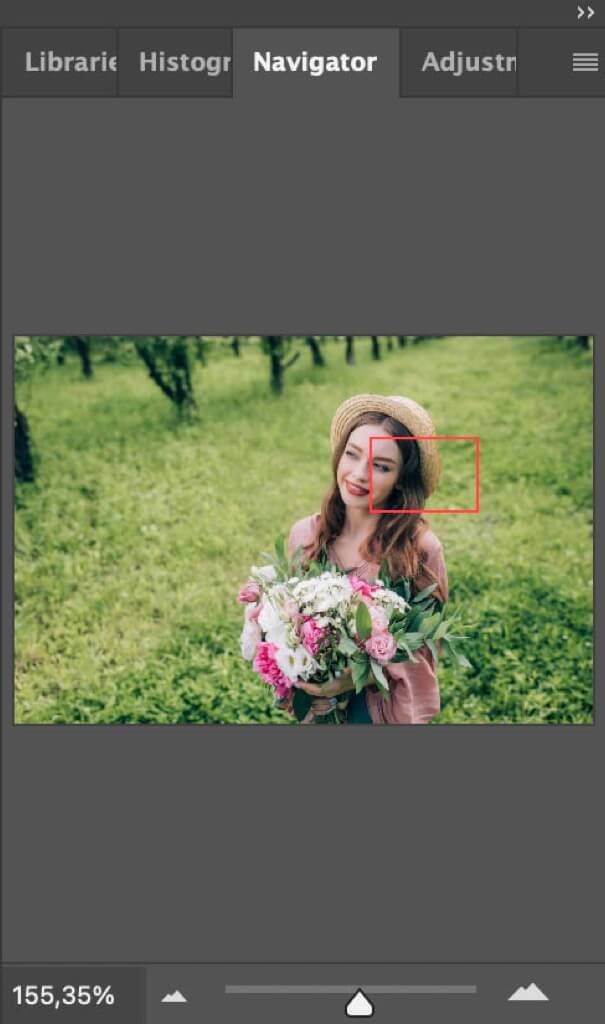
3. Navigator Window
Another way to navigate an image is by using the Navigator Panel. If the Navigator is not active, you can go to the menu Window>Navigator to activate it.
Once activated, you will see a thumbnail of your entire image. When you zoom in, you will see a red rectangle within the Navigator thumbnail, which shows the portion of the zoomed image currently being displayed.
To see a different part of the image with the same zoom level, hover your cursor over the thumbnail and click on the area that you want to see.
If you would rather pan over the image instead, click on top of the red rectangle, and drag it across the thumbnail until you reach the area you want to view.
4. Touchpad Gestures
If you use a laptop touchpad, you can swipe two fingers on it to navigate a zoomed-in picture.
- Swipe up and down to move vertically.
- Swipe left or right to move horizontally.
5. Mouse Wheel
You can also use your mouse’s scroll wheel to pan on a zoomed-in photo. It’s worth noting that you can do this regardless of the tool that’s currently active.
General Advice About Zooming
1. Zoom Presets
As you use zoom functions, you will notice there are specific zoom values where the image looks its best. If you are using keyboard shortcuts like “CTRL and +” (PC) or “CMD and -” (MAC), Photoshop will use specific preset values to zoom in and out of your photo, and these will all look good.
However, if you use a particular zoom technique that allows you to set the zoom value yourself, you may find that your image looks blurrier or softer than you know it is.
If this happens to you, activate the Zoom Tool and click once, or use the keyboard shortcut to zoom in or out to the closest preset value. You should instantly notice an improvement in sharpness.
2. 100% View
The most accurate view is when zoom levels are at 100%. This is because each image pixel is displayed in one equivalent monitor pixel.

3. Enabling Rulers
If you’re doing more precise work, you can enable rulers to help you know exactly where you are located within your image, regardless of how much you are zoomed in. To activate rulers, go to the menu View>Rulers.
You can also use rulers to see how big the area you are looking at will be if the image is printed. If you want to change the value of the rulers from inches to centimeters (or vice versa), simply right-click on top of a ruler.
Final Thoughts
As you can see, there are many ways to zoom and navigate images in Photoshop and several handy tricks that can help make your editing and retouching work more efficient and accurate.
I hope you found this information useful, and if you have any more tips – please share them in the comments below!
Do you have any questions or comments about How to Zoom and Navigate Images in Photoshop? Leave us a comment below – we would LOVE to hear from you! And PLEASE SHARE this tutorial using the social sharing buttons (we really appreciate it)!
