When building web pages, we often want to layer different elements on top of each other to create immersive, rich designs and interfaces. But, if two elements overlap, how do you control which one sits on top?

As with many things in web design, the answer lies in CSS, specifically the z-index property. The z-index property is one of the most important properties in CSS, since it allows you to control the stacking order of elements on a web page.
In this post, we’ll discuss what the z-index property means in CSS, how to use it, and some tips for getting the most out of it in your projects. Let’s get started.

Tóm Tắt
What is z-index?
z-index is the CSS property that controls the stacking order of overlapping elements on a page. An element with a higher z-index value will appear in front of an element with a lower z-index value.
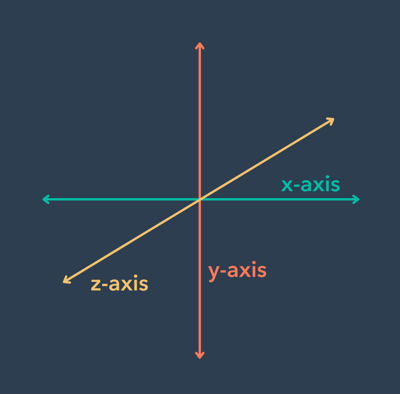
The property is called “z-index” because it sets the order of elements along the z-axis. If the x-axis goes left-to-right and the y-axis goes top-to-bottom, the z-axis adds the dimension of “toward” and “away from” the user. Elements with a higher z-index value appear closer to the user, and elements with a lower value look farther away.
If two page elements overlap and no z-index value is given (or both elements have the same z-index value), the element placed last in the HTML code will appear on top of the element placed before it in the code. Also, elements that are given a position value (other than static, the default value) appear above elements without a position in the stacking.
How to Use z-index
The z-index property uses the following syntax:
z-index: [integer]
<!-- or -->
z-index: auto
The z-index property takes an integer value. The higher the integer, the higher the element will be in the stacking order. For example, if you have two elements with a z-index of 0 and 1, the element with a z-index of 1 will be in front of the element with a z-index of 0.
z-index can also take the value auto, which sets the stacking level of the element to 0, the default value.
Let’s look at an example. First, here’s a stack of four div elements without the z-index property:
See the Pen z-index: stacking example (no z-index) by HubSpot (@hubspot) on CodePen.
As you can see, the order of the stacking is determined by the order of the divs in the HTML code. Each div is placed on top of the div before it.
Now, let’s use z-index to flip this ordering:
See the Pen z-index: stacking example (with z-index) by HubSpot (@hubspot) on CodePen.
In this example, we use z-index to override the default stacking. Now, the first written div (“first”) is at the top of the stack.
Notice in these examples that divs are also given a position value. To control an element with the z-index property, the element must have a value for position that is not static (the default). z-index will apply to elements with a position of relative, fixed, absolute, or sticky. To learn more about how the CSS position property works, see our intro guide to CSS position.
z-index can also take negative integer values, like -1. Since the default z-index value for page elements is 0, elements with a negative z-index value appear behind elements without a set z-index value.
See the Pen z-index: stacking example (negative values) by HubSpot (@hubspot) on CodePen.
z-index Stacking Context
When using z-index, it’s also important to consider how stacking is affected in nested elements, since things get a bit more complex.
A z-index value positions an element on the z-axis relative to other elements in the same stacking context. A stacking context is a group of elements that share the same parent element and whose z-index values are compared with each other.
In the examples above, all divs were in the same stacking context, being direct child elements of <body>. Here’s another example that contains multiple stacking contexts:
See the Pen z-index: stacking context example 1 by HubSpot (@hubspot) on CodePen.
In this example, we have two container divs (marked with black borders), each with two child elements. Each of these containers has its ;own stacking context.
If we take container-2 and move it underneath container-1, we can see how these stacking contexts behave:
See the Pen z-index: stacking context example 2 by HubSpot (@hubspot) on CodePen.
Notice here that div 4 is in front of div 1, even though div 1 has a higher z-index value than div 4.
This is because container-2 itself has a higher z-index than container-1. Therefore, all child elements inside container-2 will sit in front of all child elements inside container-1, no matter their z-index values. The z-index values only determine position relative to other elements in the same container (i.e., the same stacking context).
For a more in-depth look at stacking context, check out this video tutorial by Kevin Powell:
Control your element stack with z-index.
When used correctly, the z-index property is a powerful but easy-to-understand tool for ordering your elements the right way, and is a must for anyone learning CSS or Bootstrap CSS. Just make sure to keep your z-index values tidy, so you’re not getting lost in the layers!