Anyone new to Photoshop might see masking as a daunting task, believing it’s too advanced even to try approaching. However, that’s far from the case. Masking is a user-friendly, easy-to-use technique. You just first have to familiarize yourself with Adobe’s layering basics. Once you understand the fundamentals of layers, creating incredible images in Photoshop will be a cinch.
Tóm Tắt
What is masking?
Masking is the foundation of nearly every effective functionality and interface of Photoshop. On their website, Adobe defines layer masking as:
“…a reversible way to hide part of a layer. This gives you more editing flexibility than permanently erasing or deleting part of a layer. Layer masking is useful for making image composites, cutting out objects for use in other documents, and limiting edits to part of a layer.”
Advertisement
In short, layer masking makes parts of a layer invisible. Layer masking allows you to use Photoshop to remove a section of an image without deleting it. You can make the invisible portion visible again if you choose to do so.
For example, let’s say you want to make your own movie poster. You take your first image to make your poster’s backdrop — let’s say a cityscape. Then, you select the second image of your actors in front of a green screen and layer it on top of your background. You can use the masking tool to hide the green screen background to make it look like your actors are standing in front of the city.
Why use layer masking?
No one has to use a layer mask. You can use Photoshop’s Eraser tool to remove segments of your image. However, when you do this, you are deleting those segments permanently. With layer masks, you can keep every pixel of the original image accessible if you want to include it later. This also allows you to play with the transparency without destroying the image. If you catch a mistake later on, it will be hard to fix. Layer masking give’s you a way to fix mistakes with little effort.
Layer masking step by step
Photoshop offers a wide-ranging set of functions for controlling layer masks. To get started, let’s analyze a step-by-step tutorial on masking from Jimmy McIntyre.
We start with two images. In the first image, we have a yellow background and simple text that reads, “HELLO.” In the second image, we have a white background and the word “Goodbye.”
 Image courtesy: Jimmy McIntyre
 Image courtesy: Jimmy McIntyre
For this tutorial, the user will mask a portion of the first layer so the frame shows “Goodbye” and “HELLO.” In Photoshop, the image has the first layer placed on top of the second layer. This means that both images are in the document, but we only see the first image because it’s placed on top of the second. Think of it as a stack of papers.
At this point, you create your Layer Mask. You accomplish this by selecting the image you want to mask. In the example, the user selects “HELLO” by pressing the square button underneath the layers that has a circle in it.
Next, we see a white square appear next to the Hello layer. That is the Layer Mask.
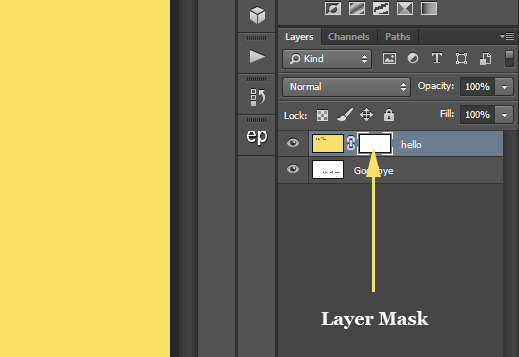 Image courtesy: Jimmy McIntyre
Getting your images into Photoshop
To get both of these images into the same Photoshop document, with each photo on its own separate layer, you need to go to the File menu. You will find it in the menu bar along the top of the screen. Choose Scripts and then choose Load Files into Stack. This opens the Load Layers dialog box. Make sure you have the Use option set to Files. You would then select the Browse button. Clicking Browse opens a File Explorer window on a PC or a Finder window on a Mac. Navigate to the location of your images on your computer. Select the two images you want to use, and then click OK in your File Explorer window or Open in your Finder window. Your images’ file names will appear in the Load Layers dialog box. Click OK to close the dialog box and load the images into your document. Photoshop will load each image into the same document, and if you look in your Layers panel, you should see each image on its own layer.
Your layer placement is important when masking. So make sure you place you arrange your images in the correct layering order. If you want to remove a portion of an image, so something beneath it will show, you need to place it above the image you want to show through.
Naming your layers
In the Layers panel, Photoshop will name the layers based on the file names of the images. You can always rename each image by double-clicking on its existing name to highlight it and entering a new name.
Before you mask, use the right settings
Before you start masking, you must follow this rule of thumb when it comes to masking: When you erase something on an image, you’re making it “invisible.” When you’re bringing that erased area back, you’re making it visible again. Photoshop identifies masking (making it visible) as the color “white “in your color’s panel. Unmasking (making it invisible) displays as the color “black.” If you want to erase something, your foreground color should be set to black. If you want to unerase something, you need to select white as your foreground color.
The default color of the Layer Mask should be white, which means that the layer is visible. If you make the mistake of selecting black as your foreground, you will end up erasing your top layer. Make sure to select the appropriate setting.
Time to start masking
Now, you would start using your paintbrush to paint over the area you want to mask. In Jimmy McIntyre’s example, the user paints over the Hello layer, exposing the Goodbye text below. Remember, you aren’t painting over the image itself. Rather, you’re painting the mask’s selection area.
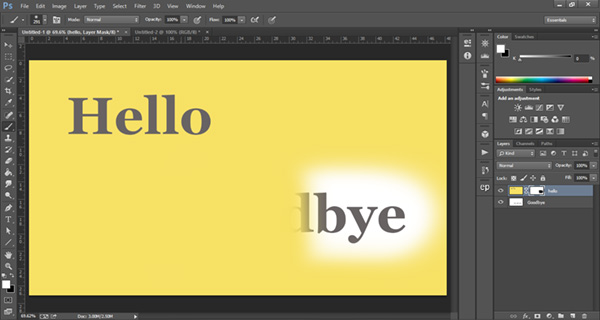 Image courtesy: Jimmy McIntyre
If you make a mistake, you can change the foreground color to white and paint over the area you painted. This will change the mask’s selection area. Also, if you want to mess with the opacity of the mask, you can lower the opacity of your brush.
There you have it
After painting the masking area, hit the mask button again near the foreground and background color button. You should then see the painted area disappear, showing a portion of the image below. Keep in mind this is a simple demonstration. If you want to learn more, you can access Jimmy McIntyre’s full course on masking here. Also, if you want to learn more about Photoshop’s tools, check out our guide on cropping and image in Photoshop.
Masking in Photoshop offers tons of creative opportunities. Once you play around with the software for a while, you will master the basics. If you want to learn more about masking, there are many tutorials, survival kits and blogs that will walk you through some of the cool things you can do with masking. Keep flourishing in your endeavors toward unlimited possibilities and creativity.