HTML5 provides a default video player for rendering video assets. However, with CSS we can tweak and customize the styling of the video player to suit our taste or match our website theme or style.
In this article, I will show you how to customize an HTML5 video player with CSS so that you can create a video player that blends seamlessly into the design of your next app.
In order to follow along in this article, you should have working knowledge of HTML, CSS, and JavaScript, in addition to a working understanding of DOM manipulation and event listening.
I also recommend you use the latest version of your browser or a Chrome browser for best performance.
Tóm Tắt
What is an HTML5 video player?
An HTML5 video player is an HTML5 streaming technology that was created as a more compatible alternative to Adobe Flash Player. It allows a broadcaster to stream video assets over web platforms via an HLS (HTTPS Live Streaming) protocol to fetch content from CDNs (Content Delivery Networks).
All major browsers and operating systems support HTML5 video players.
What does it mean to customize an HTML5 video player?
To customize an HTML5 video player means to change the default look or styling to your taste. This is done by writing a new style sheet for the DOM element that renders a selected video player.
Use cases and real life examples of customized HTML5 video players
You can find real-life examples of customized HTML5 video players on YouTube, the Cloudinary Video Player, JWPlayer, and Video JS. Each of these websites or frameworks utilize the power of CSS to customize their videos or allow their users to do the same.
As you can see, there are many use cases for custom video players, especially in apps where video is the primary function (like YouTube, for example). With the following tutorial, you will learn how to create your own HTML5 video player and customize it to look like a native part of your app.
How create a new HTML5 video player
To create a new HTML5 video player, we will need to create a new project folder. Inside the folder create an HTML file called index.html.
Type the following code in the index.html file:
<!DOCTYPE html>
<html lang="en">
<body>
    <video src="https://res.cloudinary.com/codelife/video/upload/v1637805738/intro_l5ul1k.mp4"></video>
</body>
</html>
In the code above, we have an HTML document with a video tag in the body. We also passed in a video url as source.
If you preview this webpage in a browser, you should see the following:

In the image above, the HTML5 video player renders a video that we can’t interact with because we have not set the necessary parameters to make the video player functional.
To fix this, let’s go ahead to add more attributes to the video tag. Replace the video tag in the HTML document with the following:
<video
  src="https://res.cloudinary.com/codelife/video/upload/v1637805738/intro_l5ul1k.mp4" controls autoplay loop muted width="400px" height="300px" ></video>
In the code above, we added controls to display the default controls for the video player. By default it is set to true (which means controls is the same as controls="true"). It only accepts true or false as its value.
autoplay is used to decide whether the video should start playing immediately after it is loaded or not. Every new video element has a default autoplay value of false until you include autoplay as an attribute.
loop is used to decide if a video should start again when it ends. Every new video element has a default loop value of false.
muted is used to decide if the video should play with audio or not. Every new video element has a default muted value of false .
Finally, width and height set the horizontal and vertical size of the video.
If you preview the new code in a browser, you should see the following:
Customizing the HTML5 video player
To customize the player we will need to create two additional files: script.js and style.css.
Script.js is where will write the functionality for the video’s controls, while the style.css is where we will write our stylesheet for the video. We could write the contents of the two files inside index.html but that would make our code lengthy and untidy.
Replace the content of the index.html with the following code. This will be the structure of the video before customization:
<!DOCTYPE html>
<html lang="en">
<head>
    <link rel="stylesheet" href="style.css">
    <link rel="stylesheet" href="https://cdnjs.cloudflare.com/ajax/libs/font-awesome/6.0.0-beta3/css/all.min.css" integrity="sha512-Fo3rlrZj/k7ujTnHg4CGR2D7kSs0v4LLanw2qksYuRlEzO+tcaEPQogQ0KaoGN26/zrn20ImR1DfuLWnOo7aBA==" crossorigin="anonymous" referrerpolicy="no-referrer" />
</head>
<body>
    <div class="container">
        <video onclick="play(event)" src="https://res.cloudinary.com/codelife/video/upload/v1637805738/intro_l5ul1k.mp4" id="video"></video>
        <div class="controls">
            <button onclick="play(event)"><i class="fa fa-play"></i><i class="fa fa-pause"></i></button>
            <button onclick="rewind(event)"><i class="fa fa-fast-backward"></i></button>
            <div class="timeline">
                <div class="bar">
                    <div class="inner"></div>
                </div>
            </div>
            <button onclick="forward(event)"><i class="fa fa-fast-forward"></i></button>
            <button onclick="fullScreen(event)"><i class="fa fa-expand"></i></button>
            <button onclick="download(event)"><i class="fa fa-cloud-download"></i></button>
        </div>
    </div>
    <script src="script.js"></script>
</body>
</html>
In the above code, we included our custom stylesheet (style.css) and a Font Awesome CDN link. Then we created a container div, where we included the video and all the controls we added previously.
In the controls div, we have a button that toggles the video playing state, as well as a button to reverse and forward the current time of the video, a button to preview the video in fullscreen, a button to open the video as a downloadable file, and a div to show the current position of the video timeline.
Next, we write our stylesheet. With the stylesheet, we can alter the default styling of the video player by referencing certain objects with the use of selectors, then assign a new attribute to each property we want to customize.
To do that, type the following code inside the style.css file:
.container {
    position: relative;
    display: flex;
    width: max-content;
    height: max-content;
    justify-content: center;
    align-items: center;
}
.container #video {
    width: 600px;
    height: 400px;
    border-radius: 20px;
}
.container .controls {
    position: absolute;
    bottom: 40px;
    width: 100%;
    display: flex;
    justify-content: space-around;
    opacity: 0.2;
    transition: opacity 0.4s;
}
.container:hover .controls {
    opacity: 1;
}
.container .controls button {
    background: transparent;
    color: #fff;
    font-weight: bolder;
    text-shadow: 2px 1px 2px #000;
    border: none;
    cursor: pointer;
}
.container .controls .timeline {
    flex: 1;
    display: flex;
    align-items: center;
    border: none;
    border-right: 3px solid #ccc;
    border-left: 3px solid #ccc;
}
.container .controls .timeline .bar{
    background: rgb(1, 1, 65);
    height: 4px;
    flex: 1;
}
.container .controls .timeline .bar .inner{
    background: #ccc;
    width: 0%;
    height: 100%;
}
.fa {
    font-size: 20px !important;
}
In this file, you will notice that the container has a position of relative. This is to control the position of the other elements inside it.
We set the position of the div with the controls class as position: absolute and bottom: 40px. This will place the controls div 40px from the bottom of the video container. We also specified an !important font size for our icons.
Next, our video player needs functionality, like a play, pause, and fullscreen button, plus the ability for our users to download, rewind, and forward. These functionalities will make our video player interactive.
Input the following code into script.js:
// Select the HTML5 video
const video = document.querySelector("#video")
// set the pause button to display:none by default
document.querySelector(".fa-pause").style.display = "none"
// update the progress bar
video.addEventListener("timeupdate", () => {
    let curr = (video.currentTime / video.duration) * 100
    if(video.ended){
        document.querySelector(".fa-play").style.display = "block"
        document.querySelector(".fa-pause").style.display = "none"
    }
    document.querySelector('.inner').style.width = `${curr}%`
})
// pause or play the video
const play = (e) => {
    // Condition when to play a video
    if(video.paused){
        document.querySelector(".fa-play").style.display = "none"
        document.querySelector(".fa-pause").style.display = "block"
        video.play()
    }
    else{
        document.querySelector(".fa-play").style.display = "block"
        document.querySelector(".fa-pause").style.display = "none"
        video.pause()
    }
}
// trigger fullscreen
const fullScreen = (e) => {
    e.preventDefault()
    video.requestFullscreen()
}
// download the video
const download = (e) => {
    e.preventDefault()
    let a = document.createElement('a')
    a.href = video.src
    a.target = "_blank"
    a.download = ""
    document.body.appendChild(a)
    a.click()
    document.body.removeChild(a)
}
// rewind the current time
const rewind = (e) => {
    video.currentTime = video.currentTime - ((video.duration/100) * 5)
}
// forward the current time
const forward = (e) => {
    video.currentTime = video.currentTime + ((video.duration/100) * 5)
}
In the code snippet above, we created a constant video which is used to identify the video in the various functions of the script file.
The pause icon is set to display: none by default. We then ran an event listener on the video, to check timeupdate. For every time update, we update the width of the inner progress bar to the percent current time of the total duration of the video using this formula:
let curr = (video.currentTime / video.duration) * 100
Then we created a function called play that we use to toggle the playing state of the video and decide which buttons to display. For this, we wrote some logic where, if the play button is clicked when the video.paused is true, we hide the pause button, display the play button, and play the video, else we do the opposite for each item.
For the fullscreen function, we just trigger a requestFullscreen() function on the video element. In the download function, we created a new a tag and assign the video URL as the href attribute.
Next, we set the target as _blank to open the downloadable video in a new tab. Then we programmatically clicked the new link we created using the click() function.
We also need to create functions to rewind or forward the video. We can do this by using the following logic:
For rewind:
video.currentTime = video.currentTime - ((video.duration/100) * 5)
For forward:
video.currentTime = video.currentTime + ((video.duration/100) * 5)
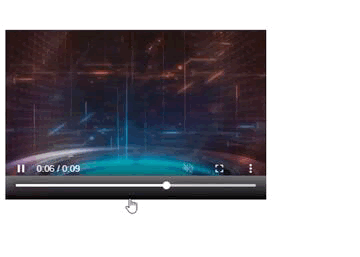
If we did everything right, we should have the following result:

Conclusion
In this article, we have learned what it means to customize an HTML5 video player and how to do it ourselves using CSS. However, you can always challenge yourself to add more features to make your video blend in even better with your own UI.
If you have any questions, feel free to drop them in the comment section below.
Is your frontend hogging your users’ CPU?
As web frontends get increasingly complex, resource-greedy features demand more and more from the browser. If you’re interested in monitoring and tracking client-side CPU usage, memory usage, and more for all of your users in production,  https://logrocket.com/signup/
As web frontends get increasingly complex, resource-greedy features demand more and more from the browser. If you’re interested in monitoring and tracking client-side CPU usage, memory usage, and more for all of your users in production, try LogRocket
LogRocket is like a DVR for web and mobile apps, recording everything that happens in your web app or site. Instead of guessing why problems happen, you can aggregate and report on key frontend performance metrics, replay user sessions along with application state, log network requests, and automatically surface all errors.
Modernize how you debug web and mobile apps — Start monitoring for free.
Share this: