Tóm Tắt
IoC Container
IoC là gì?
IoC còn có tên gọi đầy đủ là Inversion of Control, được hiểu là một nguyên lý thiết kế ứng dụng trong công nghệ phần mềm. Kiến trúc phần mềm khi áp dụng nguyên lý thiết kế này sẽ đảo ngược quyền điều khiển so với kiểu lập trình hướng thủ tục.
Nếu như trong lập trình hướng thủ tục, các đoạn mã được thêm vào sẽ gọi các thư viện thì ở IoC lại hoàn toàn khác. Những IoC container sẽ tiêm những dependencies (Dependency Injection) khi khởi tạo bean.
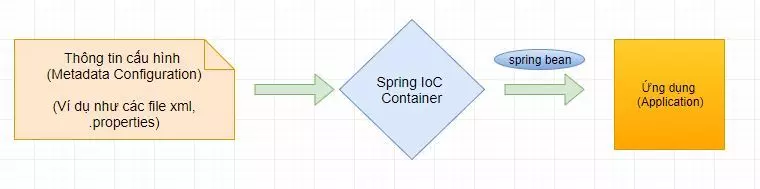
Spring IoC
IoC Container là thành phần thực hiện IoC.
Trong Spring, Spring Container (IoC Container) sẽ tạo các đối tượng, lắp rắp chúng lại với nhau, cấu hình các đối tượng và quản lý vòng đời của chúng từ lúc tạo ra cho đến lúc bị hủy.
Spring container sử dụng DI để quản lý các thành phần, đối tượng để tạo nên 1 ứng dụng. Các thành phần, đối tượng này gọi là Spring Bean (mình sẽ nói về Spring Bean trong các bài sau)
Để tạo đối tượng, cấu hình, lắp rắp chúng, Spring Container sẽ đọc thông tin từ các file xml và thực thi chúng.
Các kiểu IoC Container
1.Bean Factory
Để sử dụng Spring Bean ta cần khai báo thư viện spring-bean sau:
<
dependency>
<
groupId>
org.springframework</
groupId>
<
artifactId>
spring-beans</
artifactId>
<
version>
4.3.13.RELEASE</
version>
</
dependency>
Class HelloWorld.java
public
class
HelloWorld
{
private
String
message;
public
void
setMessage
(
String
message)
{
this
.
message =
message;
}
public
void
getMessage
(
)
{
System
.
out.
println
(
"Print : "
+
message)
;
}
}
Để tạo đối tượng HelloWorld thông qua IoC container ta sẽ cấu hình nó trong file beans.xml
<?xml version = "1.0" encoding = "UTF-8"?>
<
beans xmlns
=
"
http://www.springframework.org/schema/beans"
xmlns:
xsi =
"
http://www.w3.org/2001/XMLSchema-instance"
xsi:
schemaLocation =
"
http://www.springframework.org/schema/beans
http://www.springframework.org/schema/beans/spring-beans-3.0.xsd"
>
<
bean id
=
"
helloWorld"
class
=
"
stackjava.com.springioc.beanfactory.HelloWorld"
>
<
property name
=
"
message"
value
=
"
Hello World!"
/>
</
bean>
</
beans>
Bây giờ ta sẽ tạo một BeanFactory để đọc các thông tin cấu hình và tạo ra đối tượng HelloWorl.
BeanFactory chỉ là 1 interface, nên ở đây mình dùng DefaultListableBeanFactory, một implement của BeanFactory. Ở các version cũ thì bạn sẽ thấy hay sử dụng XmlBeanFactory nhưng nó bị đánh dấu @Deprecated ở các version mới.
DefaultListableBeanFactory
factory =
new
DefaultListableBeanFactory
(
)
;
XmlBeanDefinitionReader
reader =
new
XmlBeanDefinitionReader
(
factory)
;
reader.
loadBeanDefinitions
(
new
ClassPathResource
(
"beans.xml"
)
)
;
HelloWorld
obj =
(
HelloWorld
)
factory.
getBean
(
"helloWorld"
)
;
obj.
getMessage
(
)
;
2.Application Context
Để sử dụng Spring Bean ta cần khai báo thư viện spring-context sau:
<
dependency>
<
groupId>
org.springframework</
groupId>
<
artifactId>
spring-context</
artifactId>
<
version>
4.3.13.RELEASE</
version>
</
dependency>
Mình sẽ tạo đối tượng phức tạp hơn HelloWorl.java một chút.
Ví dụ class DataResource.java chứa thông tin kết nối tới database.
public
class
DataResource
{
private
String
driverClassName;
private
String
url;
private
String
username;
private
String
password;
public
String
getDriverClassName
(
)
{
return
driverClassName;
}
public
void
setDriverClassName
(
String
driverClassName)
{
this
.
driverClassName =
driverClassName;
}
public
String
getUrl
(
)
{
return
url;
}
public
void
setUrl
(
String
url)
{
this
.
url =
url;
}
public
String
getUsername
(
)
{
return
username;
}
public
void
setUsername
(
String
username)
{
this
.
username =
username;
}
public
String
getPassword
(
)
{
return
password;
}
public
void
setPassword
(
String
password)
{
this
.
password =
password;
}
public
void
printConnection
(
)
{
System
.
out.
println
(
"url: "
+
this
.
url +
"\n"
+
"username/password: "
+
this
.
username +
"/"
+
this
.
password)
;
}
}
Để tạo đối tượng HelloWorld thông qua IoC container ta sẽ cấu hình nó trong file applicationContext.xml (lưu ý là bạn đặt tên file là gì cũng được: bean.xml, applicationContext.xml, dataresource.xml… nhưng cần phải nhớ file cấu hình cho cái gì)
<?xml version="1.0" encoding="UTF-8"?>
<
beans xmlns
=
"
http://www.springframework.org/schema/beans"
xmlns:
xsi=
"
http://www.w3.org/2001/XMLSchema-instance"
xmlns:
p=
"
http://www.springframework.org/schema/p"
xsi:
schemaLocation=
"
http://www.springframework.org/schema/beans http://www.springframework.org/schema/beans/spring-beans-3.0.xsd"
>
<
bean id
=
"
dataResource"
class
=
"
stackjava.com.springioc.applicationcontext.DataResource"
>
<
property name
=
"
driverClassName"
value
=
"
com.mysql.jdbc.Driver"
/>
<
property name
=
"
url"
value
=
"
jdbc:mysql://localhost/database_name"
/>
<
property name
=
"
username"
value
=
"
root"
/>
<
property name
=
"
password"
value
=
"
admin1234"
/>
</
bean>
</
beans>
Tạo một đối tượng ApplicationContext để lấy thông tin từ file cấu hình và tạo đối tượng DataResource
public
static
void
main
(
String
[
]
args)
{
ApplicationContext
context =
new
ClassPathXmlApplicationContext
(
"applicationContext.xml"
)
;
DataResource
obj =
(
DataResource
)
context.
getBean
(
"dataResource"
)
;
obj.
printConnection
(
)
;
}
Kết quả:
url: jdbc:mysql://localhost/database_name
username/password: root/admin1234
Done!
Bây giờ bạn muốn thay đổi messge trong đối tượng HelloWorld, hay database của bạn thay đổi username/password hay bạn đổi kết nối sang database khác bạn chỉ cần đổi lại thông tin trong file config .xml là đã thay đổi được luồng chạy của chương trình, đó chính là IoC.