“I was working on my Windows 10 laptop, and all of a sudden, it restarted and displayed the automatic repair promptly. Now, it seems like the system is stuck on Windows 10, preparing automatic repair black screen loop, and I can’t seem to fix it!”

A friend of mine who recently encountered the Windows automatic repair black screen issue asked me this. Ideally, this can happen to any Windows 10 user in which the system encounters a problem. Instead of fixing the issue, Windows get stuck in the deadlock, and it only displays the preparing automatic repair black screen. Don’t worry – I’m going to help you fix the Windows 10 automatic repair black screen issue in different ways in this post.
Tóm Tắt
Part 1: Windows 10 Preparing Automatic Repair Black Screen: What’s the Problem?
Ideally, users can get the black screen after automatic repair due to different reasons. In this, the system doesn’t respond or boot correctly. Instead, it displays a black screen or later restarts the automatic repairing (on a loop). The following reasons can cause the Windows preparing automatic repair black screen.
- It mostly happens when the bootloader or the essential booting files are gone missing.
- A corrupt Master Boot Record (MBR) can also be a reason behind this.
- Some changes in the BIOS settings or missing Boot Configuration Data (BCD) can also cause this problem.
- It can also happen if the hard disk has been corrupted, missing, or its connection is loose.
- If the Windows drive or the firmware has been corrupted, then it can lead to this problem.
- There can be an issue with your system’s display, graphic card, or installed drivers as well.
- Any other software or driver-related issue can also trigger getting Windows 10 repair black screen.
Part 2: How Do I Fix a Black Screen after Preparing Automatic Repair?
![]()
Recent Videos from Recoverit
View More >
Since there could be different reasons for getting the black screen after preparing automatic repair on the screen, I would recommend following these suggestions.
Method 1: Boot in Safe Mode and Troubleshoot Windows Black Screen
If there is only a minor issue that has caused the Windows 10 automatic repair black screen, you can fix it by restarting your system safely. Ideally, it will only load the essential components and provide a more optimized Windows environment to troubleshoot things. Learn more ways to boot in Safe mode; check out this article.
Step 1. Go to the Windows Recovery Environment (WinRE)by doing the following steps:
Press on the power button to turn off your device.
Press on the button again to turn on.
Once Windows starts, press on the power buWinREtton again for 10 seconds to turn it off. Then press it on again.
Upon the reboot, hold on to the power button for 10 seconds to turn it off, then turn it on again.
Because you’ve repeatedly turned on and off your PC, you will be redirected to WinRE.
Step 2. Once you get the Advanced Startup screen on your Windows 10 computer, go to its Troubleshoot > Advanced Options.

Step 3. From all the provided options here, click on the “Startup Settings” feature.

Step 4. This will list different tasks that you can perform in the startup settings. Just click on the “Restart” button to continue.

Step 5. The screen will list various operations that you can perform now, including restarting your system in the safe mode. Just press the key that denotes the Safe Mode (like “4” in this case).

Step 6. That’s it! This will make your system restart in the safe mode. Once you get the following screen, you can select your choice and boot your Windows in safe mode.

Method 2: Repair MBR and Rebuild BCD
Both Master Boot Record (MBR) and Booting Configuration Data (BCD) are crucial to a system’s booting. While MBR maintains a log of the system’s booting sequence, BCD holds all the vital configuration data needed to load the firmware. If either of these components is corrupt or are not working, then it can cause the Windows 10 preparing automatic repair black screen issue. You can repair MBR and rebuild BCC on a Windows 10 system the following way:
Step 1. To repair MBR or rebuild BCD, you need to boot your system in recovery mode. For this, make sure that the Windows recovery disk has been attached to your system.
Step 2. Now, restart your system and press the BIOS key (like DEL or F2) to enter its BIOS settings. From here, you can change the boot sequence and make the connected recovery media a priority.

Step 3. This will load the windows recovery on the system and will provide the following interface. Instead of installing Windows, choose the option to repair your computer instead.

Step 4. Afterward, browse to Troubleshoot > Advanced Options and launch Command Prompt on the system.

Step 5. Once the Command Prompt is launched, we will take the assistance of the Bootrec.exe tool to fix the Windows 10 automatic repair black screen. I would recommend running the following commands:
- Bootrec /fixmbr
- Bootrec /fixboot
- Bootrec /ScanOS
- Bootrec /RebuildBcd

Apart from fixing MBR and rebuilding BCD, there are two other commands that I would recommend running. One of them will fix the boot sector (fixBoot) while the other will scan the firmware for any issue (ScanOS). After running these commands, you can close the Command Prompt and restart Windows in normal mode.
Method 3: Reinstall the Graphics Driver
Besides firmware, there can be an issue with the graphics drivers installed on your system. For instance, the display driver could be outdated, or the software can be corrupted, causing the automatic repair black screen issue. To fix the Windows automatic repair black screen caused by a driver-related issue, you can follow these steps.
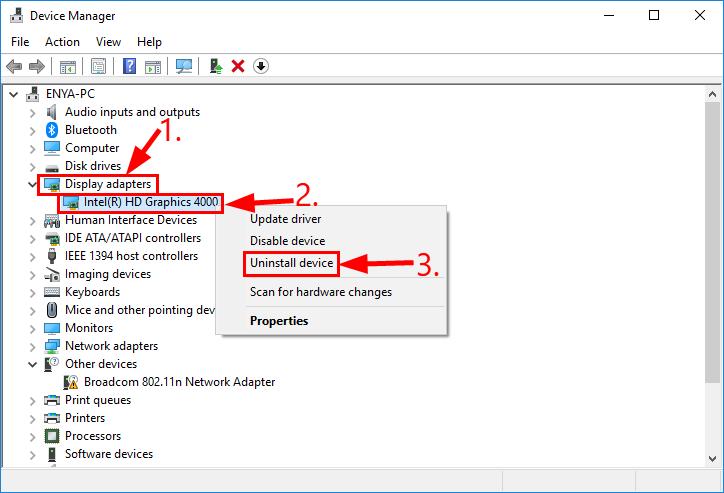
Step 1. Firstly, boot the computer with Safe mode (follow the steps in Method 1) and go to the Start menu and look for Device Manager to launch it. You can also open the Run prompt and enter the “devmgmt.msc” command to launch Device Manager.

Step 2. From the list of the installed drivers, expand the option for Display Drivers. Right-click the installed driver and choose to uninstall it from here.
Step 3. Once the driver is uninstalled, you can go to the website of your system or processor to download the relevant driver setup file.

Step 4. Launch the setup and follow a simple click-through process to install the display drivers again.

Step 5. Besides that, you can also go to the Device Manager and upgrade the installed graphics driver too. You can also disable it first and later enable it to reset the display driver.

Method 4: Rolling Back the Graphics Driver
If you have updated your graphics driver in the wrong way or a change in its settings has caused the issue, then you can consider this option. In this, we will roll back the display driver settings to a previous update to avoid any conflict. All you got to do is open the Device Manager window and double-click the display driver you wish to downgrade. Afterward, go to its “Driver” tab and click on the “Roll Back Driver” button.

This will let you roll back the driver settings to its existing update, and you can fix the Windows 10 repair black screen issue. By the way, you can also learn how to fix the black screen after an update.
Recover Your Data When the Computer Failed to Boot Up with All the Above Methods
More often than not, you can fix Windows 10, preparing automatic repair black screen error. However, the computer might still be stuck at the preparing automatic repair screen. In this case, the best choice is to reinstall the Windows system. Before doing this, you need to recover the data on the computer. But how to achieve this aim when the computer is stuck at the unnormal screen.
Fortunately, you can take the assistance of Recoverit Data Recovery. Recommended by experts, it can help you get back all kinds of data that is lost under various scenarios, even from the unbootable computer. Users can preview their data on its interface and select a location to save the extracted files. Since you don’t need any prior technical experience to use Recoverit, all you got to do is follow these steps:
- Once Recoverit has been downloaded and installed in your system, you need to tap on the data recovery mode. However, if your Windows 10 system does not reboot, click on the ‘Recover from Crash Computer mode,’ which will open a new pop-up window. Click on the ‘Start’ button to begin the process.

- You need to tap on the bootable drive mode in the next window and then insert a USB bootable drive or CD/DVD bootable drive. Tap on the ‘Create’ button to start the process.

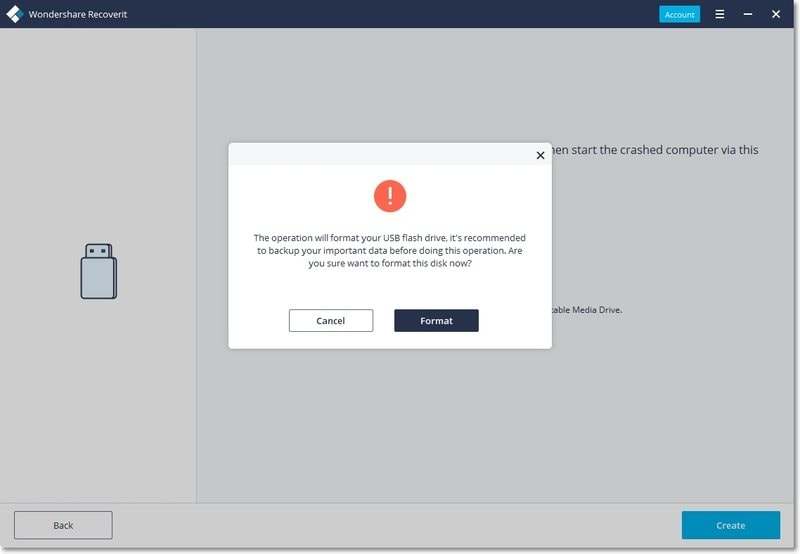
- Your system will then ask you whether you wish to full-format your USB drive in the next pop-up window. At this point, it is recommended that you back your important data. Click on the ‘Format’ button, and the process should begin.
- The program will create a bootable drive. Be aware that you cannot remove the USB flash drive. All the steps on what to do next will be displayed on your screen. Or else, you can go through the data recovery guide.
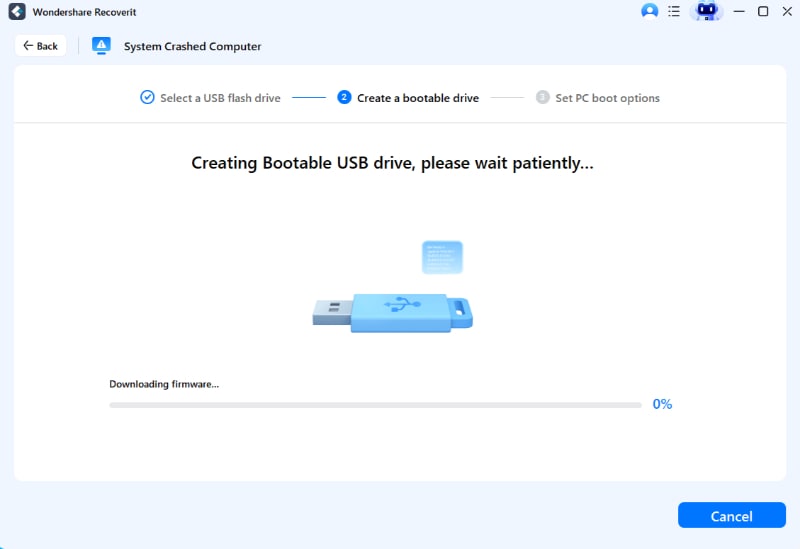
- To create a bootable drive, your system might take some time. Once done, you need to follow the three instructions flashing on your screen.
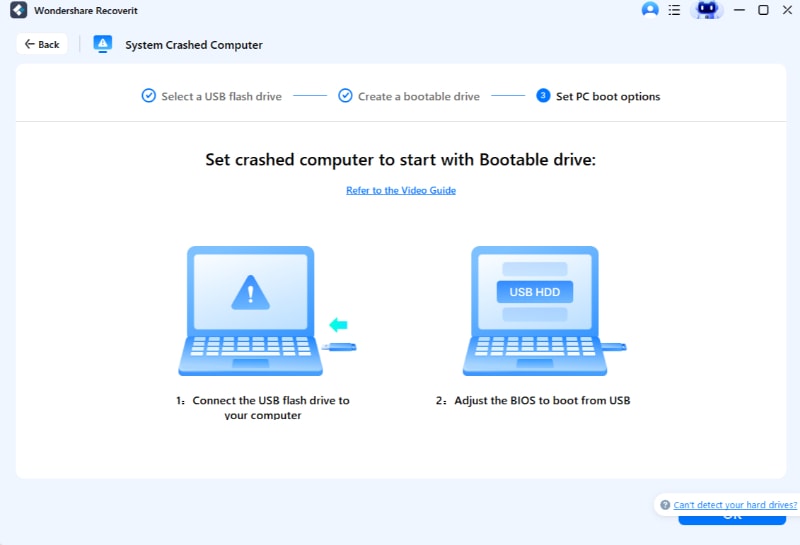
- You need to set the boot from the fresh bootable media and change the computer boot sequence. After this, you will be able to recover your data from the system.
Restart the system after this process and then tap on the F12 function key. Here, you need to enter the BIOS key. Different systems have unique BIOS entry key; you can find more about it here.

- Once the booting is done from the bootable drive, the Recoverit program should start on its own. After the process, you can recover all your lost data from your unbootable Windows 10 computer.

After you have recovered all your data, then you can reinstall the Windows system.
There you go! After reading this guide, you would certainly be able to fix the Windows 10, preparing automatic repair black screen. I have listed various methods to fix the automatic repair black screen on Windows 10 problem here. Besides that, if you have lost your files in the process, you can try Recoverit Data Recovery. It is a highly professional and user-friendly data recovery application that can help you get back all sorts of files on your Windows system.