Event (sự kiện) là một phần quan trọng của bất kỳ ứng dụng GUI nào. Tất cả các ứng dụng dạng GUI xử lý event trong suốt thời gian mà nó chạy. Event phần lớn được tạo ra bởi người dùng, nhưng cũng có lúc được tạo ra bởi chính ứng dụng. Có ba thành phần tham gia vào hệ thống event:
- Event nguồn
- Đối tượng event
- Đối tượng lắng nghe event
Event nguồn là đối tượng tạo ra sự thay đổi. Cứ có gì đó trong ứng dụng tạo ra sự thay đổi nào đó thì nó chính là event nguồn. Đối tượng event là chính bản thân cái event đó đã được mã hóa. Đối tượng lắng nghe event làm công việc xử lý event đó.
1. Đối tượng Event
Mỗi khi có thứ gì đó xảy ra thì một đối tượng event sẽ được tạo. Chẳng hạn như khi bạn click vào một button hay chọn một item trong một danh sách. Đối tượng event lưu trữ thông tin về loại sự kiện đã xảy ra. Chúng ta sẽ xem xét thông tin đó trong ví dụ dưới đây.
import
java.awt.Container;
import
java.awt.Dimension;
import
java.awt.EventQueue;
import
java.awt.event.ActionEvent;
import
java.text.DateFormat;
import
java.util.Date;
import
java.util.Locale;
import
javax.swing.AbstractAction;
import
javax.swing.BorderFactory;
import
javax.swing.DefaultListModel;
import
javax.swing.GroupLayout;
import
javax.swing.JButton;
import
javax.swing.JFrame;
import
static
javax.swing.JFrame.EXIT_ON_CLOSE;
import
javax.swing.JList;
public
class
EventObjectEx
extends
JFrame
{
private
JList list;
private
DefaultListModel model;
public
EventObjectEx
()
{
initUI();
}
private
void
initUI
()
{
Container pane = getContentPane();
GroupLayout gl = new
GroupLayout(pane);
pane.setLayout(gl);
model = new
DefaultListModel();
list = new
JList(model);
list.setMinimumSize(new
Dimension(250
, 150
));
list.setBorder(BorderFactory.createEtchedBorder());
JButton okButton = new
JButton("OK"
);
okButton.addActionListener(new
ClickAction());
gl.setAutoCreateContainerGaps(true
);
gl.setHorizontalGroup(gl.createSequentialGroup()
.addComponent(okButton)
.addGap(20
)
.addComponent(list)
);
gl.setVerticalGroup(gl.createParallelGroup()
.addComponent(okButton)
.addComponent(list)
);
pack();
setTitle("Event Example"
);
setLocationRelativeTo(null
);
setDefaultCloseOperation(EXIT_ON_CLOSE);
}
private
class
ClickAction
extends
AbstractAction
{
public
void
actionPerformed
(ActionEvent e)
{
Locale locale = Locale.getDefault();
Date date = new
Date(e.getWhen());
String tm = DateFormat.getTimeInstance(DateFormat.SHORT,
locale).format(date);
if
(!model.isEmpty()) {
model.clear();
}
if
(e.getID() == ActionEvent.ACTION_PERFORMED) {
model.addElement("Event Id: ACTION_PERFORMED"
);
}
model.addElement("Time: "
+ tm);
String source = e.getSource().getClass().getName();
model.addElement("Source: " + source);
}
}
public
static
void
main
(String[] args)
{
EventQueue.invokeLater(new
Runnable() {
public
void
run
()
{
EventObjectEx ex = new
EventObjectEx();
ex.setVisible(true
);
}
});
}
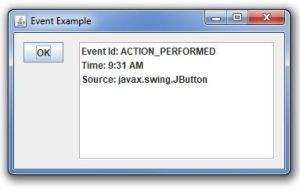
}Trong ví dụ này chúng ta tạo một button và một list, list sẽ hiển thị các thông tin về đối tượng event được gây ra bởi button.
1okButton
.addActionListener
(newClickAction());Lớp ClickAction lắng nghe sự kiện từ button OK.
private
class
ClickAction
extends
AbstractAction
{
public
void
actionPerformed
(ActionEvent e)
{
...
}
}Phương thức actionPerformed() được gọi mỗi lần sự kiện xảy ra, phương thức này nhận tham số là một đối tượng ActionEvent.
Locale locale = Locale.getDefault();
Date
date = new
Date
(e.getWhen());
String
s = DateFormat.getTimeInstance(DateFormat.SHORT,
locale).format(date);Chúng ta có thể lấy thời điểm event xảy ra từ phương thức getWhen(), thời gian trong phương thức này tính theo mili giây nên chúng ta phải định dạng lại cho phù hợp.
String source
= e.getSource().getClass().getName();
model.addElement("Source: "
+ source
);Chúng ta có thể lấy được thông tin về đối tượng gây ra event từ phương thức getSource() và một số thông tin bên trong lớp đó.
2. Tạo đối tượng lắng nghe sự kiện
Có 3 cách để tạo một đối tượng lắng nghe sự kiện trong Java Swing.
- Tạo lớp ẩn nội (Anonymous Inner class)
- Tạo lớp nội (Inner class)
- Tạo lớp kế thừa (Derived class)
Tạo lớp ẩn nội
import
java.awt.Container;
import
java.awt.EventQueue;
import
java.awt.event.ActionEvent;
import
java.awt.event.ActionListener;
import
javax.swing.GroupLayout;
import
javax.swing.JButton;
import
javax.swing.JFrame;
public
class
AnonymousInnerClassEx
extends
JFrame
{
public
AnonymousInnerClassEx
()
{
initUI();
}
private
void
initUI
()
{
Container pane = getContentPane();
GroupLayout gl = new
GroupLayout(pane);
pane.setLayout(gl);
JButton closeButton = new
JButton("Close"
);
closeButton.setBounds(40
, 50
, 80
, 25
);
closeButton.addActionListener(new
ActionListener() {
public
void
actionPerformed
(ActionEvent event)
{
System.exit(0
);
}
});
gl.setAutoCreateContainerGaps(true
);
gl.setHorizontalGroup(gl.createSequentialGroup()
.addComponent(closeButton)
.addGap(220
)
);
gl.setVerticalGroup(gl.createSequentialGroup()
.addComponent(closeButton)
.addGap(180
)
);
pack();
setTitle("Event Example"
);
setLocationRelativeTo(null
);
setDefaultCloseOperation(EXIT_ON_CLOSE);
}
public
static
void
main
(String[] args)
{
EventQueue.invokeLater(new
Runnable() {
public
void
run
()
{
AnonymousInnerClassEx ex =
new
AnonymousInnerClassEx();
ex.setVisible(true
);
}
});
}
}Trong ví dụ này chúng ta tạo một đối tượng lắng nghe sự kiện từ một button.
JButton closeButton = new
JButton("Close"
);Khi click button thì thoát chương trình.
closeButton.addActionListener(new
ActionListener() {
public
void
actionPerformed
(ActionEvent event)
{
System.exit(0
);
}
});Để gắn một đối tượng lắng nghe vào một component thì chúng ta dùng phương thức addActionListener(). Ở đây chúng ta dùng lớp “ẩn nội”, nếu bạn chưa biết thì tức là tạo một đối tượng và code các phương thức trừu tượng ngay bên trong một phương thức khác.
Tạo lớp nội
import
java.awt.Container;
import
java.awt.EventQueue;
import
java.awt.event.ActionEvent;
import
java.awt.event.ActionListener;
import
javax.swing.GroupLayout;
import
javax.swing.JButton;
import
javax.swing.JFrame;
public
class
InnerClassExample
extends
JFrame
{
public
InnerClassExample
()
{
initUI();
}
private
void
initUI
()
{
Container pane = getContentPane();
GroupLayout gl = new
GroupLayout(pane);
pane.setLayout(gl);
JButton closeButton = new
JButton("Close"
);
ButtonCloseListener listener = new
ButtonCloseListener();
closeButton.addActionListener(listener);
gl.setAutoCreateContainerGaps(true
);
gl.setHorizontalGroup(gl.createSequentialGroup()
.addComponent(closeButton)
.addGap(220
)
);
gl.setVerticalGroup(gl.createSequentialGroup()
.addComponent(closeButton)
.addGap(180
)
);
pack();
setTitle("Event Example"
);
setLocationRelativeTo(null
);
setDefaultCloseOperation(EXIT_ON_CLOSE);
}
private
class
ButtonCloseListener
implements
ActionListener
{
public
void
actionPerformed
(ActionEvent e)
{
System.exit(0
);
}
}
public
static
void
main
(String[] args)
{
EventQueue.invokeLater(new
Runnable() {
public
void
run
()
{
InnerClassExample ex = new
InnerClassExample();
ex.setVisible(true
);
}
});
}
}Ví dụ này cũng giống ví dụ trên, chỉ khác là chúng ta dùng lớp “nội”: định nghĩa một lớp bên trong một lớp khác, tuy nhiên các lớp này phải được implements từ lớp ActionListener.
private
class
ButtonCloseListener
implements
ActionListener
{
public
void
actionPerformed
(ActionEvent e)
{
System.exit(0
);
}
}Tạo lớp kế thừa
import
java.awt.Container;
import
java.awt.EventQueue;
import
java.awt.event.ActionEvent;
import
java.awt.event.ActionListener;
import
javax.swing.GroupLayout;
import
javax.swing.JButton;
import
javax.swing.JFrame;
public
class
DerivedClassExample
extends
JFrame
{
public
DerivedClassExample
()
{
initUI();
}
private
void
initUI
()
{
Container pane = getContentPane();
GroupLayout gl = new
GroupLayout(pane);
pane.setLayout(gl);
MyButton closeButton = new
MyButton("Close"
);
gl.setAutoCreateContainerGaps(true
);
gl.setHorizontalGroup(gl.createSequentialGroup()
.addComponent(closeButton)
.addGap(220
)
);
gl.setVerticalGroup(gl.createSequentialGroup()
.addComponent(closeButton)
.addGap(180
)
);
pack();
setTitle("Event Example"
);
setLocationRelativeTo(null
);
setDefaultCloseOperation(EXIT_ON_CLOSE);
}
private
class
MyButton
extends
JButton
implements
ActionListener
{
public
MyButton
(String text)
{
super
.setText(text);
addActionListener(this
);
}
public
void
actionPerformed
(ActionEvent e)
{
System.exit(0
);
}
}
public
static
void
main
(String[] args)
{
EventQueue.invokeLater(new
Runnable() {
public
void
run
()
{
DerivedClassExample ex = new
DerivedClassExample();
ex.setVisible(true
);
}
});
}
}Trong ví dụ này chúng ta cũng tạo một button có chức năng thoát chương trình, nhưng ở đây chúng ta tạo một lớp kế thừa từ lớp JButton là implements sẵn giao diện ActionListener. Tức là bản thân lớp này đã tự động lắng nghe các sự kiện click rồi, không cần phải dùng đến phương thức addActionListener() như với lớp ẩn nội nữa.
private
class
MyButton
extends
JButton
implements
ActionListener
{
public
MyButton
(String text)
{
super
.setText(text);
addActionListener(this
);
}
public
void
actionPerformed
(ActionEvent e)
{
System.exit(0
);
}
}3. Gắn một listener vào nhiều component
Một listener có thể lắng nghe từ nhiều component khác nhau.
Ví dụ:
import
java.awt.BorderLayout;
import
java.awt.EventQueue;
import
java.awt.event.ActionEvent;
import
java.awt.event.ActionListener;
import
javax.swing.BorderFactory;
import
javax.swing.GroupLayout;
import
javax.swing.JButton;
import
javax.swing.JFrame;
import
static
javax.swing.JFrame.EXIT_ON_CLOSE;
import
javax.swing.JLabel;
import
javax.swing.JPanel;
public
class
MultipleSources
extends
JFrame
{
private
JLabel statusbar;
public
MultipleSources
()
{
initUI();
}
private
void
initUI
()
{
JPanel panel = new
JPanel();
GroupLayout gl = new
GroupLayout(panel);
panel.setLayout(gl);
statusbar = new
JLabel("Ready"
);
statusbar.setBorder(BorderFactory.createEtchedBorder());
ButtonListener butlist = new
ButtonListener();
JButton closeButton = new
JButton("Close"
);
closeButton.addActionListener(butlist);
JButton openButton = new
JButton("Open"
);
openButton.addActionListener(butlist);
JButton findButton = new
JButton("Find"
);
findButton.addActionListener(butlist);
JButton saveButton = new
JButton("Save"
);
saveButton.addActionListener(butlist);
gl.setAutoCreateContainerGaps(true
);
gl.setAutoCreateGaps(true
);
gl.setHorizontalGroup(gl.createParallelGroup()
.addComponent(closeButton)
.addComponent(openButton)
.addComponent(findButton)
.addComponent(saveButton)
.addGap(250
)
);
gl.setVerticalGroup(gl.createSequentialGroup()
.addComponent(closeButton)
.addComponent(openButton)
.addComponent(findButton)
.addComponent(saveButton)
.addGap(20
)
);
gl.linkSize(closeButton, openButton,
findButton, saveButton);
add(panel, BorderLayout.CENTER);
add(statusbar, BorderLayout.SOUTH);
pack();
setTitle("Event Example"
);
setLocationRelativeTo(null
);
setDefaultCloseOperation(EXIT_ON_CLOSE);
}
private
class
ButtonListener
implements
ActionListener
{
public
void
actionPerformed
(ActionEvent e)
{
JButton o = (JButton) e.getSource();
String label = o.getText();
statusbar.setText(" "
+ label + " button clicked"
);
}
}
public
static
void
main
(String[] args)
{
EventQueue.invokeLater(new
Runnable() {
public
void
run
()
{
MultipleSources ms = new
MultipleSources();
ms.setVisible(true
);
}
});
}
}4. Gắn nhiều listener vào một component
Nếu có thể dùng một listener cho nhiều component thì cũng có thể gắn nhiều listener vào một component.
import
java.awt.BorderLayout;
import
java.awt.EventQueue;
import
java.awt.event.ActionEvent;
import
java.awt.event.ActionListener;
import
java.util.Calendar;
import
javax.swing.BorderFactory;
import
javax.swing.GroupLayout;
import
static
javax.swing.GroupLayout.Alignment.CENTER;
import
static
javax.swing.GroupLayout.DEFAULT_SIZE;
import
static
javax.swing.GroupLayout.PREFERRED_SIZE;
import
javax.swing.JButton;
import
javax.swing.JFrame;
import
javax.swing.JLabel;
import
javax.swing.JPanel;
import
javax.swing.JSpinner;
import
javax.swing.SpinnerModel;
import
javax.swing.SpinnerNumberModel;
public
class
MultipleListeners
extends
JFrame
{
private
JLabel statusbar;
private
JSpinner spinner;
private
int
count = 0
;
public
MultipleListeners
()
{
initUI();
}
private
void
initUI
()
{
JPanel panel = new
JPanel();
GroupLayout gl = new
GroupLayout(panel);
panel.setLayout(gl);
add(panel, BorderLayout.CENTER);
statusbar = new
JLabel("0"
);
statusbar.setBorder(BorderFactory.createEtchedBorder());
add(statusbar, BorderLayout.SOUTH);
JButton addButton = new
JButton("+"
);
addButton.addActionListener(new
ButtonListener1());
addButton.addActionListener(new
ButtonListener2());
Calendar calendar = Calendar.getInstance();
int
currentYear = calendar.get(Calendar.YEAR);
SpinnerModel yearModel = new
SpinnerNumberModel(currentYear,
currentYear - 100
,
currentYear + 100
,
1
);
spinner = new
JSpinner(yearModel);
spinner.setEditor(new
JSpinner.NumberEditor(spinner, "#"
));
gl.setAutoCreateContainerGaps(true
);
gl.setHorizontalGroup(gl.createSequentialGroup()
.addComponent(addButton)
.addGap(20
)
.addComponent(spinner, DEFAULT_SIZE,
DEFAULT_SIZE, PREFERRED_SIZE)
);
gl.setVerticalGroup(gl.createSequentialGroup()
.addGroup(gl.createParallelGroup(CENTER)
.addComponent(addButton)
.addComponent(spinner, DEFAULT_SIZE,
DEFAULT_SIZE, PREFERRED_SIZE))
);
pack();
setTitle("Event Example"
);
setSize(300
, 200
);
setLocationRelativeTo(null
);
setDefaultCloseOperation(EXIT_ON_CLOSE);
}
private
class
ButtonListener1
implements
ActionListener
{
public
void
actionPerformed
(ActionEvent e)
{
Integer val = (Integer) spinner.getValue();
spinner.setValue(++val);
}
}
private
class
ButtonListener2
implements
ActionListener
{
public
void
actionPerformed
(ActionEvent e)
{
statusbar.setText(Integer.toString(++count));
}
}
public
static
void
main
(String[] args)
{
EventQueue.invokeLater(new
Runnable() {
public
void
run
()
{
MultipleListeners ml = new
MultipleListeners();
ml.setVisible(true
);
}
});
}
}Trong ví dụ này chúng ta tạo một button, một spinner và một statusbar. Chúng ta định nghĩa 2 listener và gắn cả hai listener này vào button, một listener sẽ thay đổi giá trị trên spinner, một listener sẽ thay đổi đoạn text trong statusbar.
5. Xử lý sự kiện di chuyển
Trong ví dụ này chúng ta tìm hiểu về cách bắt sự kiện có liên quan đến sự hiện diện của component.
import
java.awt.Container;
import
java.awt.EventQueue;
import
java.awt.Font;
import
java.awt.event.ComponentEvent;
import
java.awt.event.ComponentListener;
import
javax.swing.GroupLayout;
import
javax.swing.JFrame;
import
javax.swing.JLabel;
public
class
MovingWindowEx
extends
JFrame
implements
ComponentListener
{
private
JLabel labelx;
private
JLabel labely;
public
MovingWindowEx
()
{
initUI();
}
private
void
initUI
()
{
Container pane = getContentPane();
GroupLayout gl = new
GroupLayout(pane);
pane.setLayout(gl);
addComponentListener(this
);
labelx = new
JLabel("x: "
);
labelx.setFont(new
Font("Serif"
, Font.BOLD, 14
));
labelx.setBounds(20
, 20
, 60
, 25
);
labely = new
JLabel("y: "
);
labely.setFont(new
Font("Serif"
, Font.BOLD, 14
));
labely.setBounds(20
, 45
, 60
, 25
);
gl.setAutoCreateContainerGaps(true
);
gl.setAutoCreateGaps(true
);
gl.setHorizontalGroup(gl.createParallelGroup()
.addComponent(labelx)
.addComponent(labely)
.addGap(250
)
);
gl.setVerticalGroup(gl.createSequentialGroup()
.addComponent(labelx)
.addComponent(labely)
.addGap(130
)
);
pack();
setTitle("Event Example"
);
setLocationRelativeTo(null
);
setDefaultCloseOperation(EXIT_ON_CLOSE);
}
public
void
componentResized
(ComponentEvent e)
{
}
public
void
componentMoved
(ComponentEvent e)
{
int
x = e.getComponent().getX();
int
y = e.getComponent().getY();
labelx.setText("x: "
+ x);
labely.setText("y: "
+ y);
}
public
void
componentShown
(ComponentEvent e)
{
}
public
void
componentHidden
(ComponentEvent e)
{
}
public
static
void
main
(String[] args)
{
EventQueue.invokeLater(new
Runnable() {
public
void
run
()
{
MovingWindowEx ex = new
MovingWindowEx();
ex.setVisible(true
);
}
});
}
}6. Sử dụng lớp Adapter thay thế cho Listener
Trong ví dụ trên chúng ta implement giao diện ComponentListener và phải override toàn bộ các phương thức ảo trong giao diện này, như thế rất khó chịu, chính vì thế và Java đã tạo ra các lớp adapter. Adapter đơn giản là các lớp đã implement sẵn các lớp listener tương ứng và override toàn bộ phương thức ảo trước rồi. Vì thế nên khi dùng adapter chúng ta chỉ cần dùng các phương thức mà chúng ta muốn thôi.
Ví dụ:
- Giao diện ComponentListener bắt buộc bạn phải override các phương thức ảo componentResized(), componentMoved(), componentShown(), và componentHidden() mặc dù bạn không muốn.
- Lớp ComponentAdapter đã implement sẵn giao diện ComponentListener và override toàn bộ các phương thức ảo trên rồi, bạn chỉ cần override lại phương thức mà bạn muốn.
Ví dụ dưới đây giống như ví dụ ở trên, chỉ khác là chúng ta dùng lớp ComponentAdapter.
import
java.awt.Container;
import
java.awt.EventQueue;
import
java.awt.Font;
import
java.awt.event.ComponentAdapter;
import
java.awt.event.ComponentEvent;
import
javax.swing.GroupLayout;
import
javax.swing.JFrame;
import
javax.swing.JLabel;
public
class
AdapterExample
extends
JFrame
{
private
JLabel labelx;
private
JLabel labely;
public
AdapterExample
()
{
initUI();
}
private
void
initUI
()
{
Container pane = getContentPane();
GroupLayout gl = new
GroupLayout(pane);
pane.setLayout(gl);