The windows automatic repair process is intended to relieve you from the stress of manually finding and fixing underlying issues with your system. While the automatic repair process tends to work most of the time, the startup repair options are not easy to deal with. Therefore, getting stuck in preparing automatic repair loop is a widespread issue.
This article will show you how to fix the preparing automatic repair loop error. Therefore, let’s jump in and get started.
Tóm Tắt
Preparing Automatic Repair Loop: Potential Causes
While the error message is relatively common, certain factors incur this behavior. Most of them are rather simple to track; others are highly elusive. Therefore, tracking them can be a nightmare for the end-user.
The most common reason for such an error is the system files corruption. Your system restore tries to read files to know the steps it needs to take. However, the files in place are already corrupted, and therefore, it gets stuck in preparing automatic repair loop. There is no error message for this issue, so it’s tough to decipher what went wrong from looks alone.
Here are some of the most common reasons that mess up the system restore files for your PC:
- Malware Infections: These attacks are intended to harm your system. They can attack Windows Registry and your boot configuration data, causing it to mess up your automatic repair settings. Thus, your PC gets stuck in a boot loop issue.
- Drivers Mismatch: Certain versions of Windows drivers are notoriously bad and can cause your system to believe untruthful data. Your system tends to think you’re missing critical functionalities needed to boot properly, prompting an endless repair loop.
- Power Outages: While this might seem unlikely, shutting the PC down while a file is opened in write mode can cause it to get corrupted. This is because the system file checker draws an extremely odd picture for the Windows 10 automatic repair to comprehend, so it gets stuck.
- Bad Sectors: These sectors occur whenever the verification code does not match the data. While you won’t be getting a blue screen error message for it, it’s still highly likely for you to lose important data, primarily if the issue occurs in the boot sector.
The repairing process is similar no matter the cause. Therefore, we recommend optimizing your storage configuration data to prevent such errors from occurring.
Windows Automatic Repair Tool

System Information
-
Your machine is currently running
Windows 10
-
Restoro is compatible with your operating system.
Recommended: To repair Windows 10 Errors, use this software package; Restoro System Repair. This repair tool has been proven to identify and fix these errors and other Windows problems with very high efficiency.
Download Now
Restoro System Repair

-
100% safe as confirmed by Norton.
-
Only your system and hardware are evaluated.
Fixing Preparing Automatic Repair Loop
While there is no way of physically repairing the corrupted system files, it’s still possible to interchange or replaces them for the system to work correctly. With that being said, here are the methods that can be used to fix the automatic repair loop for both Windows 10 and Windows 11:
1. Hard Reboot Your Computer
You don’t need to get your hands winded up in anything fancy in most scenarios. Instead, you can perform a complete computer restart and hope for the best. Despite being janky, the method works rather well on most computers.
If you’re having trouble restarting the computer from the preparing automatic repair loop, then you can follow the steps mentioned below:
- Method 1: Press and hold the Power Button until the computer shuts down. Press the power button again to boot it back up.
- Method 2: Pull the power cable out of the socket to shut your PC down. Despite being risky, it’s a legitimate way of getting out of odd windows boot sequences. Plug the cord back in and press the Power Button to let the windows boot manager do its thing.
It’s worth noting that a hard reboot should only be initiated if your computer fails to get out of the automatic repair loop. This is because restarting a computer without operating system support can result in permanently lost data through file corruption.
2. Initiate a Boot in Safe Mode
Safe mode works by only running the essential components needed for a computer to run. Almost all versions of Windows come with a built-in safe mode dating back to the Windows XP era and even before. This method is generally used to stop any potential crashes while processing the computer boot sequence.
With that said, here is how you can enable safe mode in Windows 10 and 11:
- Press the power button located under the cog icon from the Start Menu.
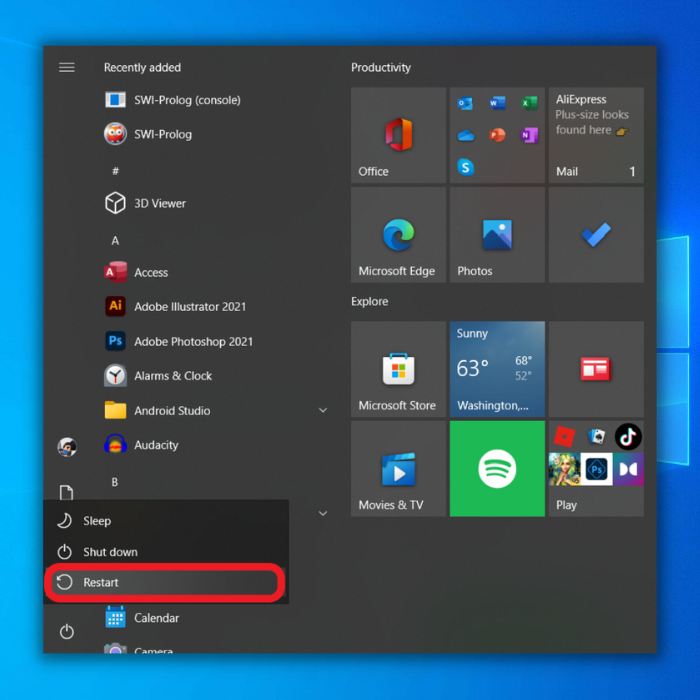
- In the start submenu, hold the Shift key and press Restart.
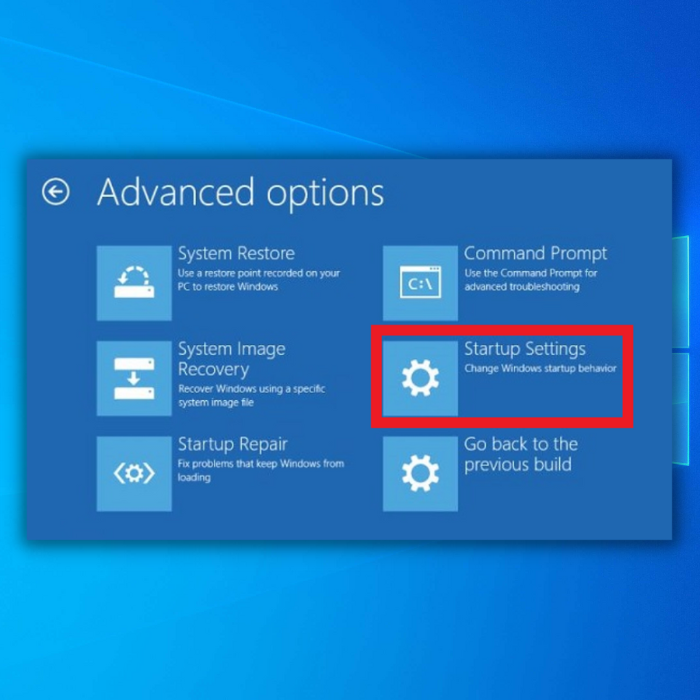
- Wait for the system to boot into Windows Boot Menu. Click on Troubleshoot > Advanced Options > Startup Settings and tap on the Restart button.
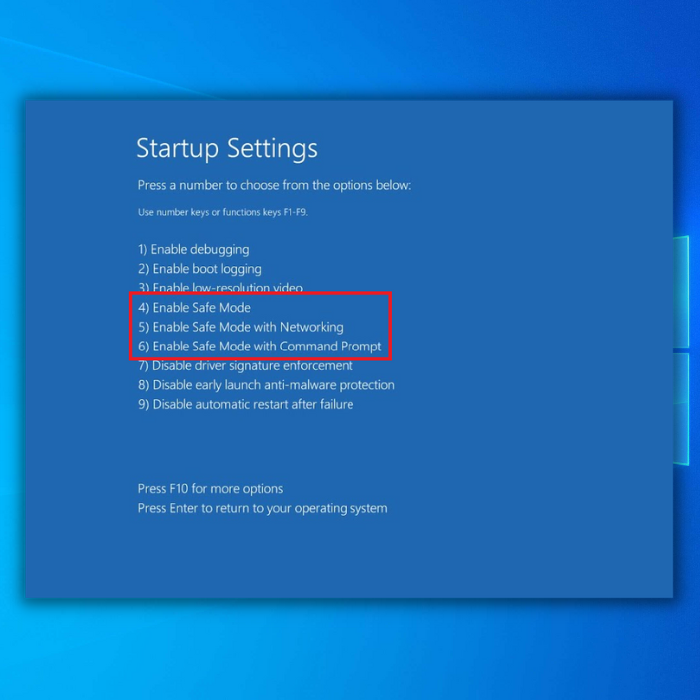
- Once the restart has finished, you will be greeted with the Startup Settings menu. In there, press 4 to enable safe mode. Alternatively, you can also enable the safe mode with networking by pressing 5. It’s generally better to go with option five here.
- Once your PC is booting in safe mode, try to initiate the automatic repair sequence again. If everything goes as intended, you won’t be getting stuck in preparing automatic repair loop again.
3. Repair Missing/Corrupted System Files
Windows possesses an automatic repair sequence for fixing missing and corrupted system files. The utility is easily accessible from the command prompt and can be used any number of times. However, if it doesn’t work on the first few tries, it might be worth looking into a better solution.
That being said, here is what you need to do:
- Restart your computer from the start menu and hold the F8 key during the boot sequence. Once you’re through the boot screen, the Windows Recovery Environment will load. The method of accessing it might vary, depending on your computer.
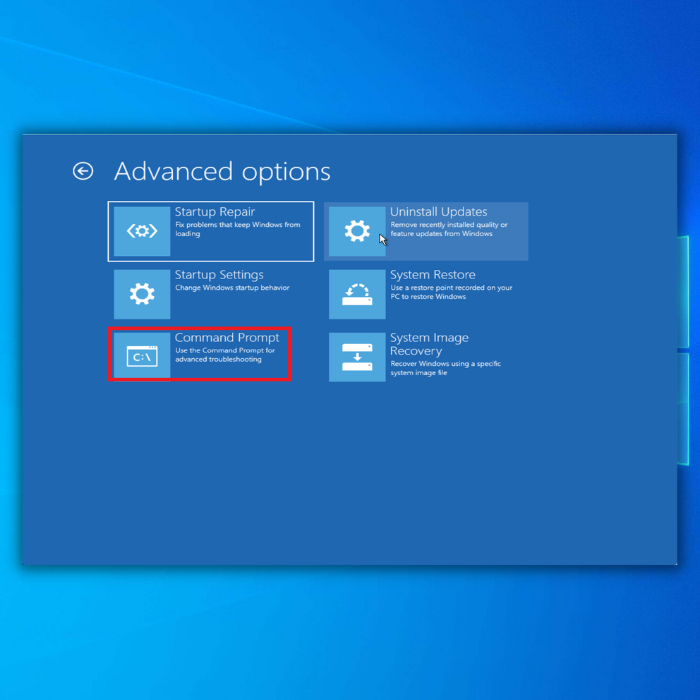
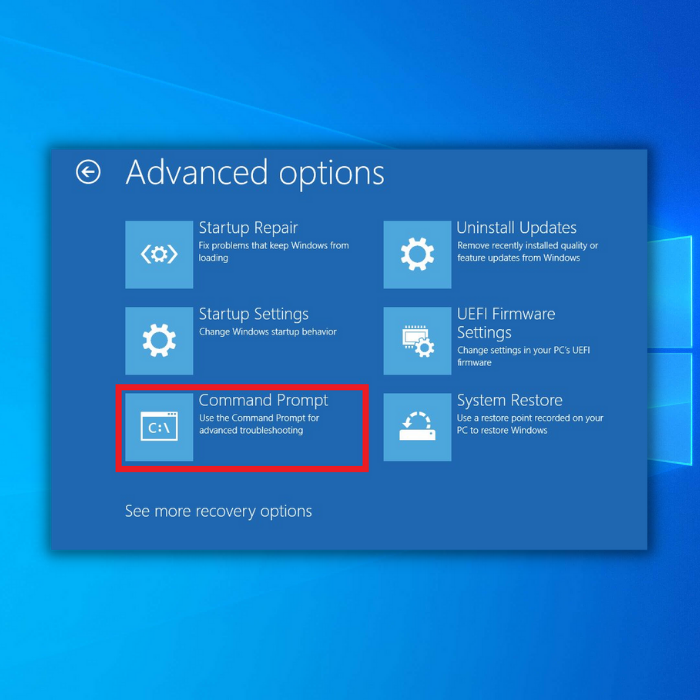
- Once loaded, head to the Troubleshoot menu and choose Advanced Options. These advanced boot options are your go-to hub for whenever you encounter issues with Windows stuck errors and vice versa,
- Click on Command Prompt and wait for the utility to open.
- Type in sfc /scannow and press enter to execute it.
The system file checker will automatically check all the files to find and repair any discrepancies that might be present. Therefore, wait for the system file checker to complete the process before initiating a computer restart.
4. Disable Automatic Repair
If the feature refuses to work correctly, it might be worth disabling automatic repair to eliminate the endless repair loop. This is more of a workaround than an ideal solution, and therefore, it should let you have a hassle-free boot without all the automatic repair shenanigans.
There are a total of two methods of disabling automatic repair. One caters to the scenario before boot failure, while the other is intended for after everything is done and dusted.
Edit BSD (Pre Boot Failure)
To edit the BSD, follow the steps mentioned below:
- Search and open the command prompt from the start menu in administrator mode. This can be done by right-clicking the utility to choose the Run As Administrator option.

- In the command prompt, type in bcdedit and wait for it to load the values.
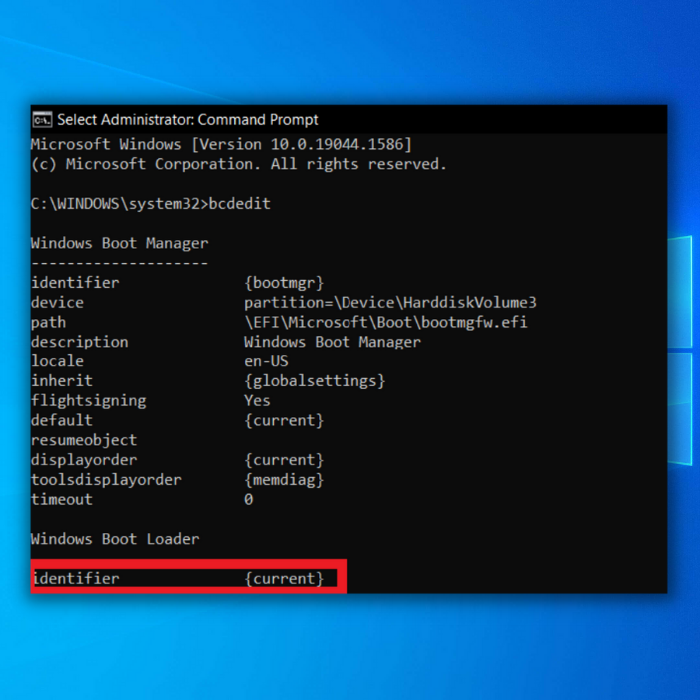
- Copy the identifier value and type your next command in the following sequence:
bcdedit /set {current} recoveryenabled noWhere the {current} variable is the copied identifier value.
Edit BSD (Post Boot Failure)
The steps to disable automatic repair are mentioned below:
- Once the boot attempt fails, you will be greeted with a Startup Settings screen prompting Startup Repair couldn’t repair your PC. From there, click on Advanced Options.
- Head to the Troubleshoot menu and navigate your way through the Advanced Options. Click on Command Prompt to load the Command Prompt Window.

- Once the utility is accessible, the rest of the steps are identical. Enter the bcdedit command and copy the identifier value.
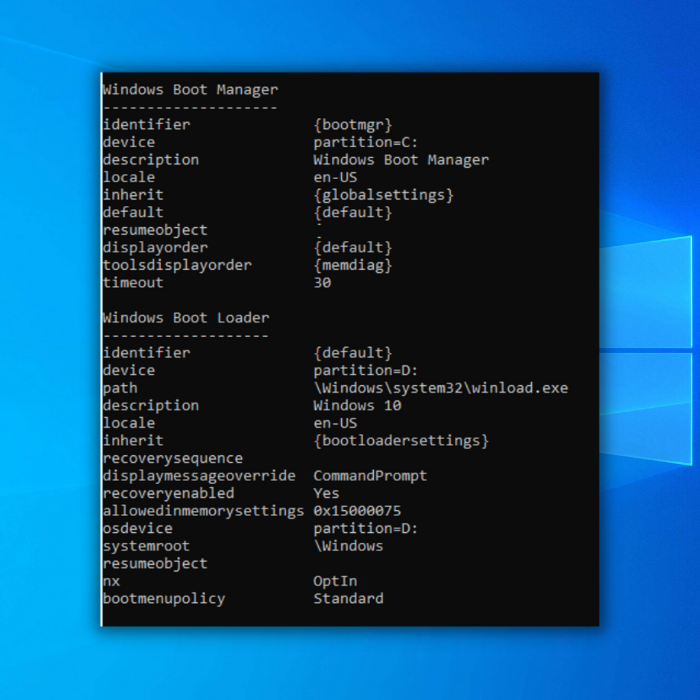
- Paste and enter it in the format of the following commands:
bcdedit /set {default} recoveryenabled noWhere the {default} variable is the copied identifier value.
While disabling the feature instead of running something like a safe mode might seem like a risky option. Windows won’t tell you which files it’s repairing during the repair screen. Therefore, you can only guess whether the utility is working correctly or if it’s stuck in a Windows automatic repair loop.
5. Rebuild BCD With Command Prompt Window
Since all the soft preparing automatic repair fixes have refused to function, it’s time to implement some aggressive countermeasures. Rebuilding your boot configuration data is one of the few mild methods implemented in this approach.
As the name might suggest, the Boot Configuration Data is a critical chunk of information that tells the Windows Boot Loader in the Runtime Environment about the location of all the boot information needed to get the PC started.
Having corrupted BCD messes up with the master boot record. While the Windows System files in BCD are a necessity for not getting stuck in preparing automatic repair loop, the following steps can be taken to rebuild them entirely from scratch:
- Open Command Prompt. If you can boot into Windows using safe mode, use the start menu method mentioned previously. Otherwise, you can head to the Startup Settings > Troubleshoot > Advanced Options to open Command Prompt.
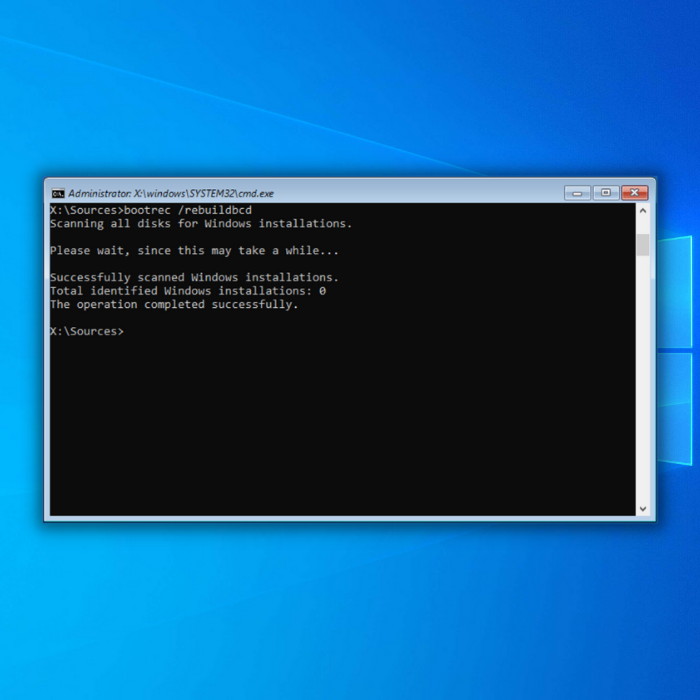
- In there, type the following commands in the specified sequence:
bootrec /fixmbrbootrec /fixbootbootrec /scanosbootrec /rebuildbcd
After each command has finished executing, you’ll see the “Successfully scanned Windows installations” message pop up in the Command Prompt. This indicates that the BCD rebuild process has successfully been completed.
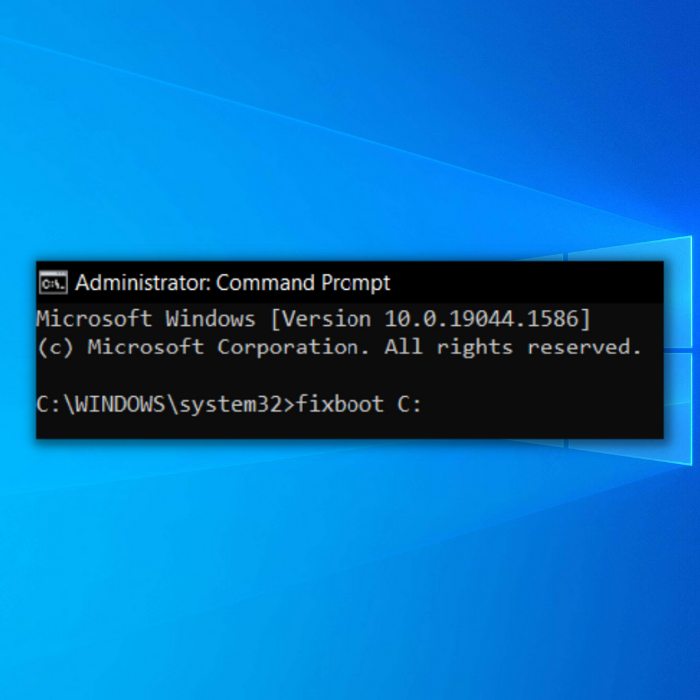
6. Force Boot Using Command Prompt
Command Prompt features a Fixboot command that lets your PC automatically repair any errors associated with the booting sequence. While it does fix boot loop errors in most scenarios, the method is instead hit or miss due to the unreliability of Windows automated processes.
You will need to open Command Prompt from the Startup settings or the Safe Mode boot, and this can be done in any of the mentioned ways. If you’re trying to open Command Prompt from safe mode, make sure it’s working with administrator privileges.
Consequently, you can follow up with the chkdsk C: /r command to repair any possible file issues in the storage medium.

After that, enter the fixboot C: command and wait for the system restore process to finish.
7. Restore Windows Registry
This method should only be used if you haven’t made any prior changes to the Windows registry. This is because there will be lost data during the data recovery process of the registry. Downloading problematic files from the internet is a significant reason for the Windows registry to get corrupted. Therefore, make sure to keep your antivirus software up to date.
With that said, you will need to open Command Prompt once again from the Windows Recovery Environment. After that, follow the steps mentioned below:
Type in the following code in the Command Prompt and press enter for the system to execute it. This is also a good way of getting rid of a possible black screen and blue screen error message.
C:\Windows\System32\config\regback*
C:\Windows\System32\config\ - From the computer-listed options, type All and press enter. The Windows registry will use the defaults as the restore point.
Once the restore process has been finished, reboot your Windows. If you’re still stuck on the Windows 10 automatic repair error, it might be time to use the official windows solution.
8. Perform System Restore
This option allows your PC to go back into an older copy of your PC. However, you need to have a prior Windows Restore Point to make this work. It’s a good way of getting rid of the preparing automatic repair error message, but all your save files past the Windows restore point will bite the dust.
Accessing the restore point without booting into the PC is rather tedious. Therefore, you need to follow the steps mentioned below diligently:
- Click on Troubleshoot > Advanced Options in the Windows Recovery Environment and head to System Restore.

- From there, select the system restore point you want to jump to. The ideal restore point is before preparing automatic repair loop error started occurring. Therefore, make sure to jump before that.
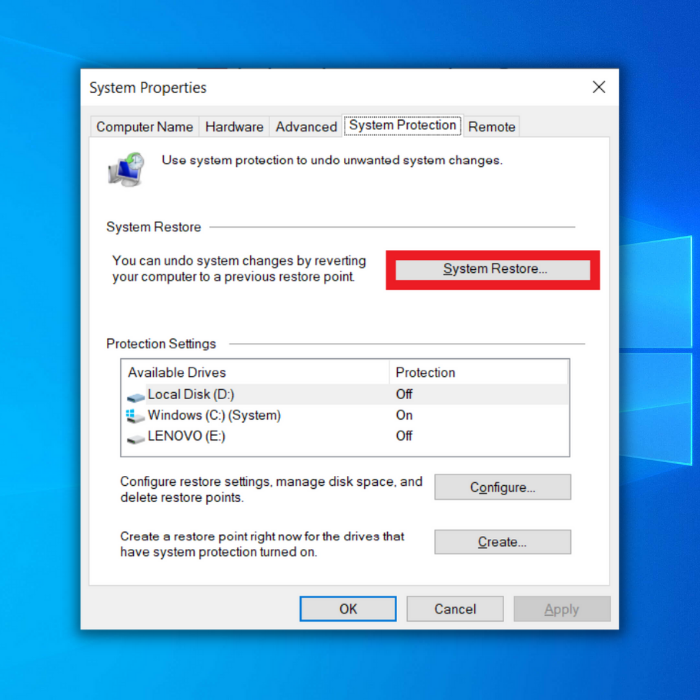
- By Default, Windows 10 creates restore points whenever a new update is installed. Thus, you will have plenty of options if a restore point is specified.
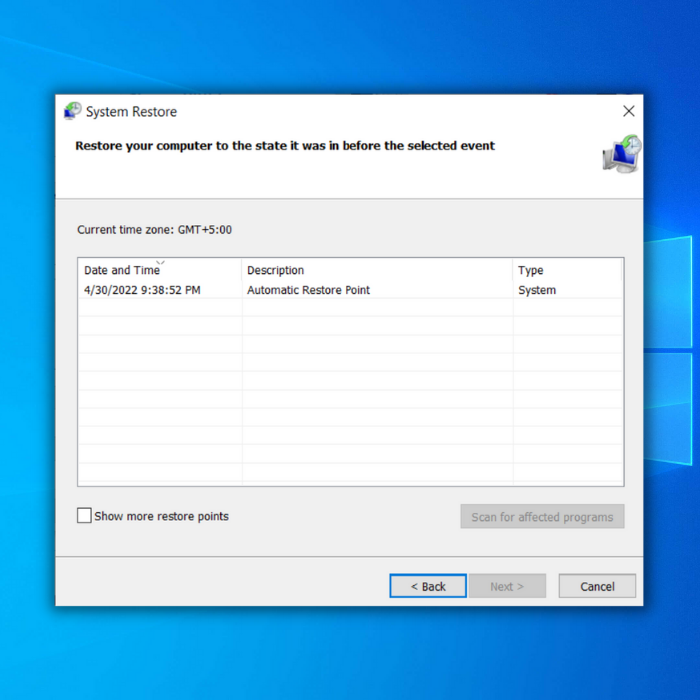
Once the process is finished, restart your computer, and it should get the issue fixed. However, it’s worth noting that the system fails to restore to a previous installation media if specific registry files are corrupted.
Therefore, booting into advanced repair options won’t be your saving grace if you’re getting a PC error message during the process. If such an incident occurs, try booting your PC in safe mode to repeat the steps. Despite this, the error might continue to stay; in that case, a Windows 10 reinstall would be due.
9. Reinstall Windows 10
Suppose all of the methods mentioned above have failed. Then it’s time to re-install your copy of Windows 10. This process is generally the least recommended despite having the highest chances of success. The reason is quite simple; you might lose a lot of valuable settings and data during a Windows 10 reinstall.
Nonetheless, a clean reinstall is enough to remove most Windows Recovery Environment errors. While certain hardware-related black screen and blue screen errors might stay, the preparing automatic repair error has no chance of standing against this method.
With that said, there are multiple methods to install Windows 10. Let’s look at the most prominent ones in detail.
Using Windows Installation Media
The Windows Installation Media can be used to burn a Windows ISO file on a USB flash drive. You will need to back your Windows 10 files to the cloud to preserve that data. That being said, here is how you can reinstall Windows through installation media.
- Download the installation media setup from the following links:
- Windows 7
- Windows 8.1
- Windows 10
- Windows 11
- Burn the ISO file into a USB drive. Here is what you’ll need to check before creating installation media:
- Reliable Internet Connection (For downloading ISO)
- Product Key (For non-digital licenses)
- Connect the media to your PC and open file explorer to click the setup.exe file.
- Choose your options and press enter. You might want to delete problematic files if the cause of the automatic repair loop was a malware issue.

- Once the setup is up and running, click on install and select Next.
After that, your PC will restart several times during the installation process. Once the setup has been installed, you will be greeted with a fresh copy of Windows 10. Consequently, your recovery environment will be reset, and there will be no need to uninstall suspicious software.
Using WinToUSB
If the startup repair isn’t working, then there’s a decent chance that you won’t be able to install Windows 10 the conventional way. Therefore, a third-party application might be in play. However, this version will be called “Windows To Go” instead of regular Windows 10, so it should only be used as a last resort.
This method will require you to have the following:
- A USB Caddy or a Relevant Converter (to connect the drive to another computer externally).
- Another PC (for installing the image onto the drive)
While this will eliminate the automatic repair blue screen, you will need to perform some physical labor. Therefore, get ready to do a bit of physical work. With that said, here are the steps necessary to reinstall Windows 10 without the windows setup window or the repair screen:
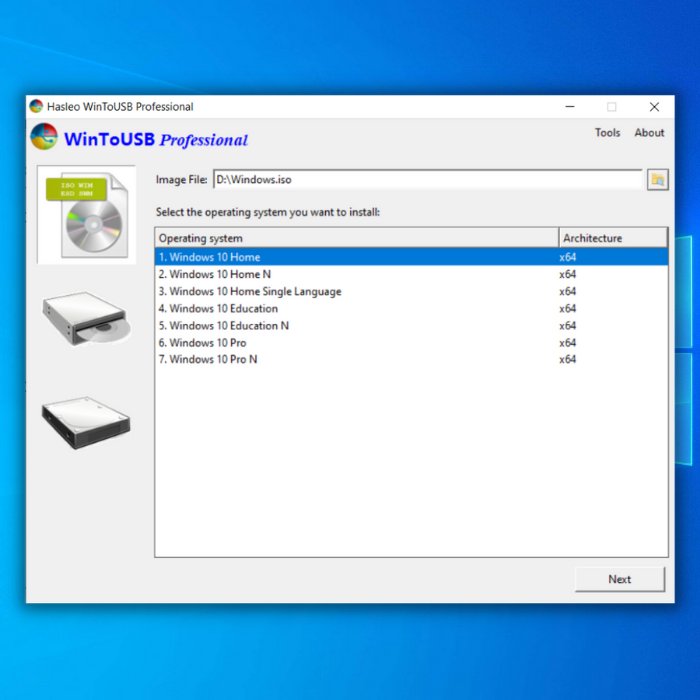
- Download the WinToUSB application from the website. You will have the option to select between the free and the paid version. Luckily, the free version will do the job just fine.
- Download the ISO file of your preferred Windows version from the Microsoft website.

- Open the WinToUSB application after installing it and click on the browse button and choose your downloaded ISO file from the file manager.
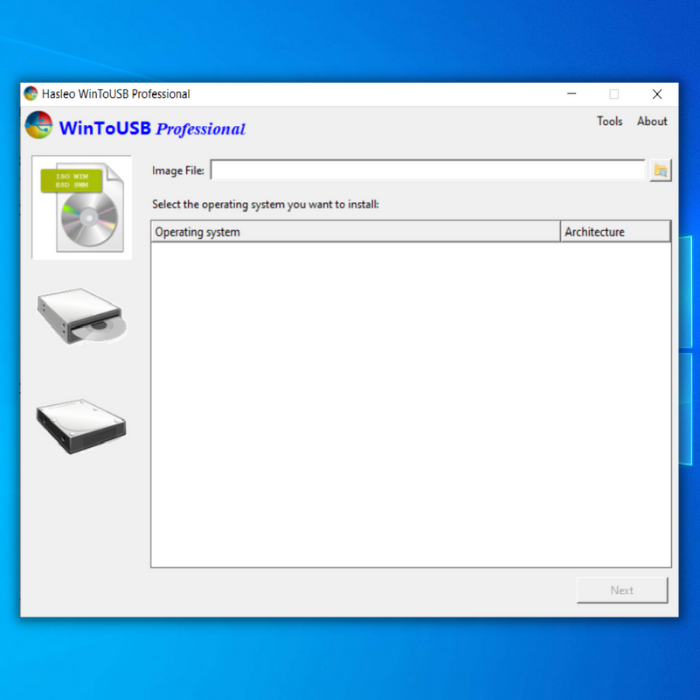
- From the visible options, select the Windows version you want to install. Ideally, you won’t be going for the single language options, and however, there is no issue in choosing them.
- Before clicking Next, attach the Drive from your PC through a medium like Caddy.
- Select the drive in the setup and keep hitting next at the default options.

- In the partition panel, select a partition scheme. Ideally, you would want to assign 180 GB to your C drive while the rest can go for storage, then hit next.
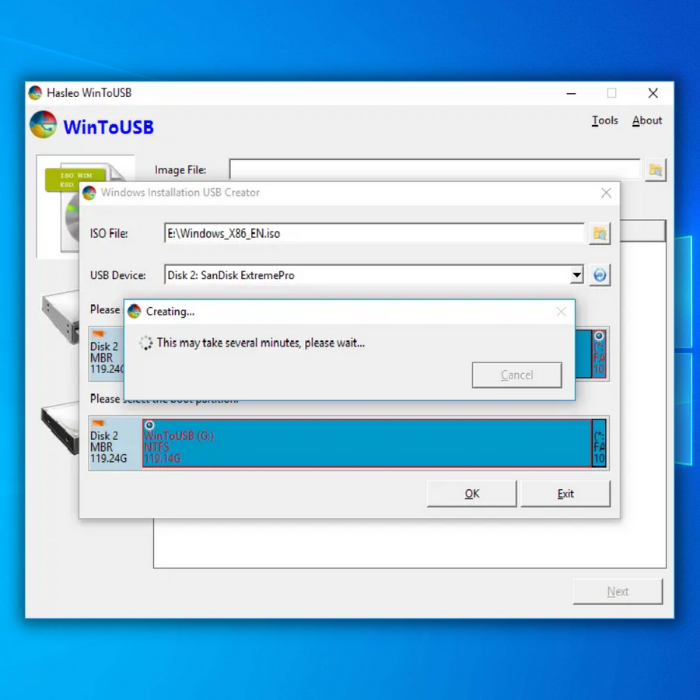
Once the setup has finished, unplug the drive to put it back on your PC. Boot it up, and you shouldn’t be seeing a preparing automatic repair window by now.