JPanel, a part of the Java Swing package, is a container that can store a group of components. The main task of JPanel is to organize components, various layouts can be set in JPanel which provide better organization of components, however, it does not have a title bar.
Tóm Tắt
Constructors of JPanel
- JPanel(): creates a new panel with a flow layout
- JPanel(LayoutManager l): creates a new JPanel with specified layoutManager
- JPanel(boolean isDoubleBuffered): creates a new JPanel with a specified buffering strategy
- JPanel(LayoutManager l, boolean isDoubleBuffered): creates a new JPanel with specified layoutManager and a specified buffering strategy
Commonly used Functions of JPanel
- add(Component c): Adds a component to a specified container
- setLayout(LayoutManager l): sets the layout of the container to the specified layout manager
- updateUI(): resets the UI property with a value from the current look and feel.
- setUI(PanelUI ui): sets the look and feel of an object that renders this component.
- getUI(): returns the look and feel object that renders this component.
- paramString(): returns a string representation of this JPanel.
- getUIClassID(): returns the name of the Look and feel class that renders this component.
- getAccessibleContext(): gets the AccessibleContext associated with this JPanel.
Let us take a sample program in order to illustrate the use of JPanel class by appending sequential execution snapshots of outputs justifying the below program sets as follows:
Example:
Java
import java.awt.*;
import java.awt.event.*;
import javax.swing.*;
class solution extends JFrame {
static JFrame f;
static JButton b, b1, b2;
static JLabel l;
public static void main(String[] args)
{
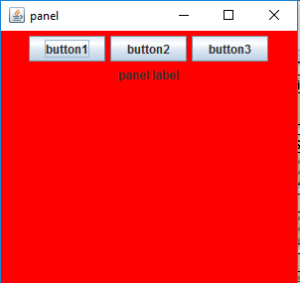
f = new JFrame("panel");
l = new JLabel("panel label");
b = new JButton("button1");
b1 = new JButton("button2");
b2 = new JButton("button3");
JPanel p = new JPanel();
p.add(b);
p.add(b1);
p.add(b2);
p.add(l);
p.setBackground(Color.red);
f.add(p);
f.setSize(300, 300);
f.show();
}
}
Output:
Example 2:
Java
import java.awt.*;
import java.awt.event.*;
import javax.swing.*;
class solution extends JFrame {
static JFrame f;
static JButton b, b1, b2, b3;
static JLabel l;
public static void main(String[] args)
{
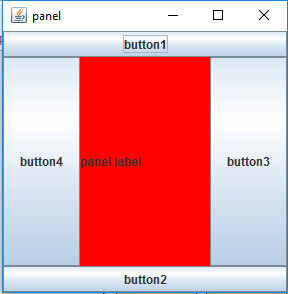
f = new JFrame("panel");
l = new JLabel("panel label");
b = new JButton("button1");
b1 = new JButton("button2");
b2 = new JButton("button3");
b3 = new JButton("button4");
JPanel p = new JPanel(new BorderLayout());
p.add(b, BorderLayout.NORTH);
p.add(b1, BorderLayout.SOUTH);
p.add(b2, BorderLayout.EAST);
p.add(b3, BorderLayout.WEST);
p.add(l, BorderLayout.CENTER);
p.setBackground(Color.red);
f.add(p);
f.setSize(300, 300);
f.show();
}
}
Output:
Example 3:
Java
import java.awt.*;
import java.awt.event.*;
import javax.swing.*;
class solution extends JFrame {
static JFrame f;
static JButton b, b1, b2, b3;
static JLabel l;
public static void main(String[] args)
{
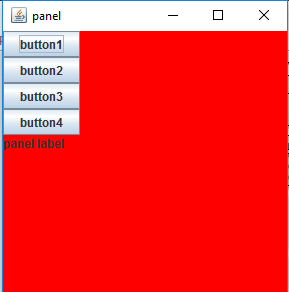
f = new JFrame("panel");
l = new JLabel("panel label");
b = new JButton("button1");
b1 = new JButton("button2");
b2 = new JButton("button3");
b3 = new JButton("button4");
JPanel p = new JPanel();
p.setLayout(new BoxLayout(p, BoxLayout.Y_AXIS));
p.add(b);
p.add(b1);
p.add(b2);
p.add(b3);
p.add(l);
p.setBackground(Color.red);
f.add(p);
f.setSize(300, 300);
f.show();
}
}
Output:
Henceforth, we are successfully able to generate buttons in our panel.
Note: In the previous Program, border layout and Box Layout are used. Different other layouts can be used to organize the components in a definite pattern, such as card layout, grid layout, etc.
My Personal Notes
arrow_drop_up