In the previous article in this series, you learned the most basic information every designer needs to know about the Photoshop Brush Tool. With this one, we’ll learn how to more precisely control the brush, and push the limits of its use.
The most complex settings for brushes can be found in the Brush Panel.
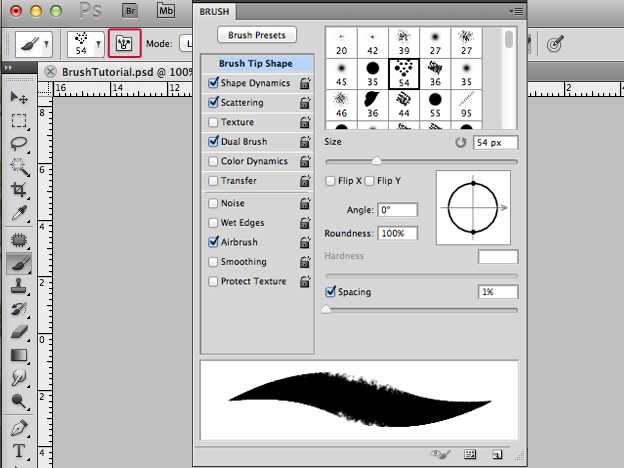
Open the Brush Panel from the toolbar or over the menu Window > Brush. There is also a shortcut (F5). As you can see, the settings are split into several different categories. We covered the Brush Presets in our previous article, so let’s start by going through the other categories.
Tóm Tắt
1. Brush Tip Shape
The Brush Tip Shape gives us several very interesting options. It’s best to explore them with a unique brush shape, so I’ve selected the Leaf Brush to demonstrate. I’ve also unchecked all of the other category settings to isolate just the single functionality for now.
Spacing
Though it’s at the bottom of the panel, lets start by exploring the Spacing, a very powerful option. Per default the spacing is set to 25% for the Leaf Brush. Play around to adjust the spacing for your stroke, which will look different for each brush.

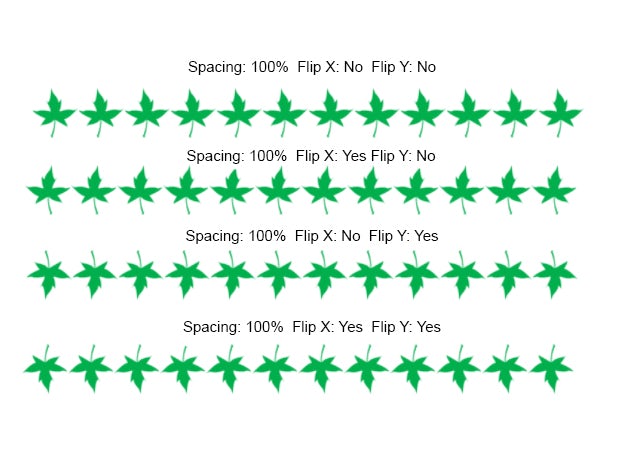
Flip X/Y
The Flip X and Flip Y options allow you to flip the brush shape horizontally, vertically or both together.
Angle
To control the angle you can either:
- Type in a value in the edit field.
- Click on the horizontal line in the small preview image of the brush roundness. Drag the line around the circle, which will increase or decrease the value of the angle.

Roundness
Roundness can also be set using the small preview image. This time you must click the small dot in the bottom or at the top of the small image and drag up or down. And again, as an alternative you can type the value into the edit field.

The roundness option simply defines the roundness of the brush tip as if it were 100% a perfect circle. If you decrease the value the brush tip will squeeze together in an elliptical tip, until it ends in an almost flat line at 0%.
Hardness
Hardness gives you control over the brush edge. 0% produces a soft blurred edge, while 100% makes a sharp and crisp edge (see demo for this in the original post here)
2. Shape Dynamics
For this step, please make sure that only the Shape Dynamics are activated in the Brush Panel.
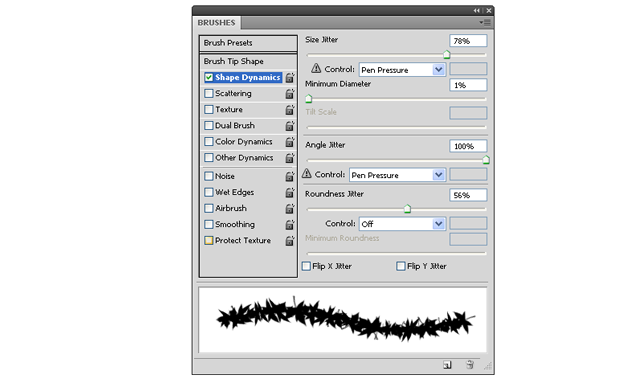
Size Jitter
This setting controls the size of the brush tip each time a new leaf is to be painted on the canvas — they don’t all have to share the same size. The higher the Size Jitter setting, the higher the range in size will be between the smallest and the largest leaf stamped on the page.

Minimum Diameter
This sets the minimum size to which a brush can scaled down.
Angle Jitter
Angle Jitter changes the orientation, or angle, of your brush.

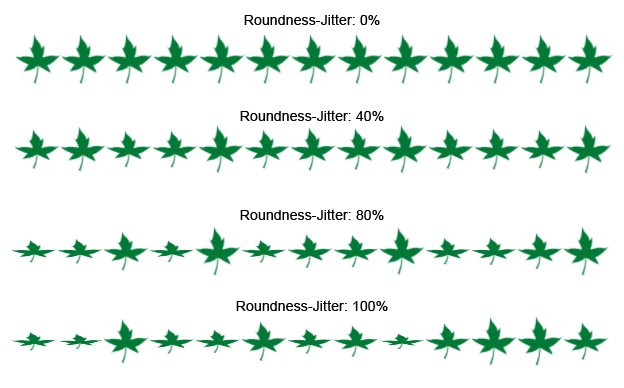
Roundness Jitter
This option randomizes the roundness of your brush tip.
3. Scattering
Again, with this new option, make sure there are no other settings selected. The Scattering setting gives us three simple sliders.
Scatter
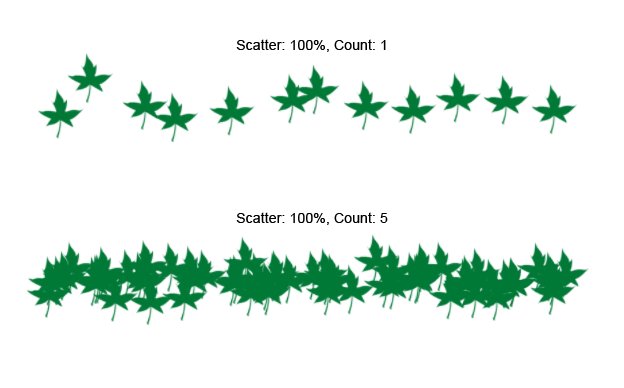
This is how spread out the brush tips are. With a Scatter of 0% the leaf will be in a perfect horizontal line. In the image below you can see how the leaf scatters out from this line when we move the slider to around 121%. If you click the check box labeled ‘Both Axes,’ the scatter will move both along the horizontal and the vertical axes.

Count
With this slider you can control how many brush tips Photoshop will paint on the canvas each time you click. By default, when you click down the paintbrush acts like a stamp — one image at a time. With the count function, you can increase how many of these images are stamped. With a count of five, Photoshop will paint five leaves on the canvas instead of only one.
Count Jitter
Photoshop can also randomly change the count value each time the brush is used, so the more to the right you drag the slider, the more randomness you will get. Please note that you must set the count value to a higher value than one before the Count Jitter will start applying any randomness.
4. Texture
Let’s start testing this one by cleaning up the canvas, and making sure texture is the only thing selected on the Brush Panel. For this example, I’ll use a hard round brush to demonstrate.

Mode
Once you’ve selected the texture you want in the drop down at the top, take a look down below at the mode setting. This will determine how you’re seeing the pattern in the preview. Most of the modes that you see here will look familiar, as they’re also showing the Layer Blend Modes. I set mine to multiply, but feel free to play around a bit to get a better feeling for the different modes.
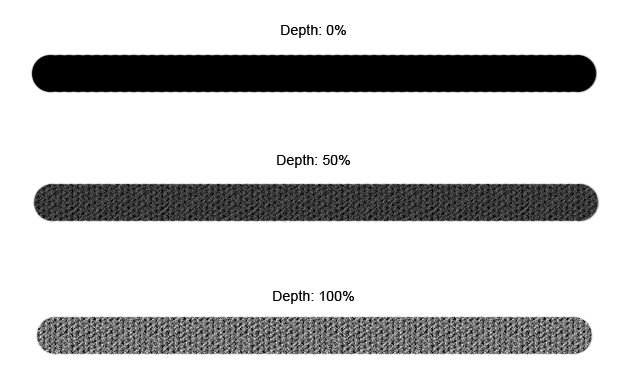
Depth
Imagine Depth as Opacity. A Depth of 0% will show only the brush stroke with nothing from the texture, 50% will show a texture half opaque, and 100% will show the stroke fully textured.
Depth Jitter
Catching on to the trend here with the Jitter function? This one is the same, randomizing the stroke’s depth.
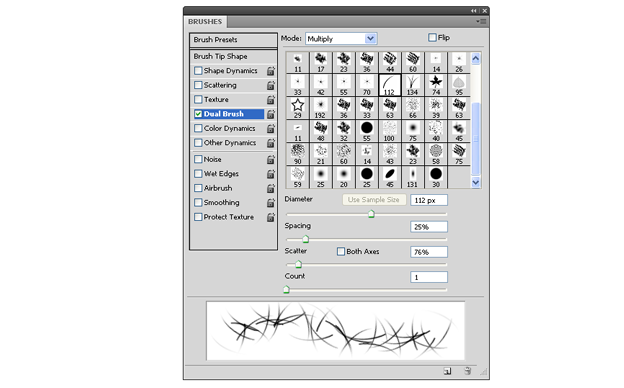
5. Dual Brush
As you may imagine already from the name, with Dual Brush you can combine two brushes into one.
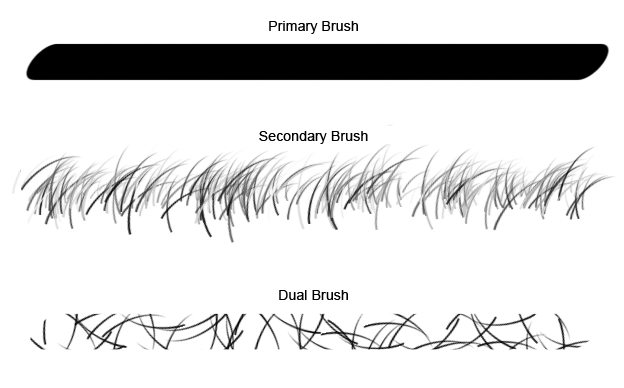
Select a tip shape, and activate the Dual Brush Settings. Then select your secondary brush, I used the Dune Grass brush. The settings like Diameter, Spacing, Scatter and Count you should already be familiar with, so adjust as necessary.
Photoshop uses the Primary Brush as mask for the Secondary Brush. So in our case, the Dune Grass Brush is masked by the Primary Brush.
Color Dynamics
With the Color Dynamics you can control the color which will be applied to the brush stroke.
Hue Jitter

The first Jitter is the Foreground/Background Jitter. As you can see in the image above I have set my colors to brown and green. Let’s try to paint some brush strokes with these settings:

The Foreground/Background Jitter controls how much of the background color will be applied to the brush stroke. With a value of 0% only the foreground color will be applied, while a value of 100% will add also the background color to the brush stroke.
Hue/Saturation/Brightness Jitters
These Jitter settings allow you to control your colors on a more advanced level, allowing you to dictate how random you want the colors to be in your stroke. The image below shows each setting at the maximum value of 100%.

Purity
The last slider you will find in the Color Dynamics is the Purity. With this slider you can set how pure the saturation is. A value of 0% will do nothing. A value of 100% will limit the saturation value to 100%. You can use this sliders to make sure the a saturation value never goes above your designated percentage.
6. Other Dynamics
This setting gives you control over the Opacity and the Flow, allowing you to randomize them with the Jitter function.

7. Effects
There are a couple of other effects that can be found on the bottom of the Brush Panel’s menu.
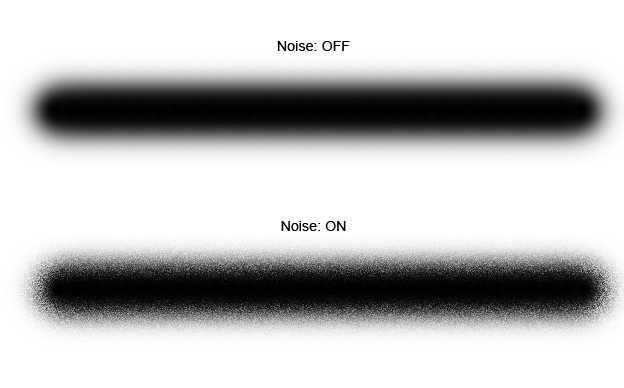
Noise
This option creates noise with the gray values of your brush shape. The example below shows a soft rounded brush with and without noise.
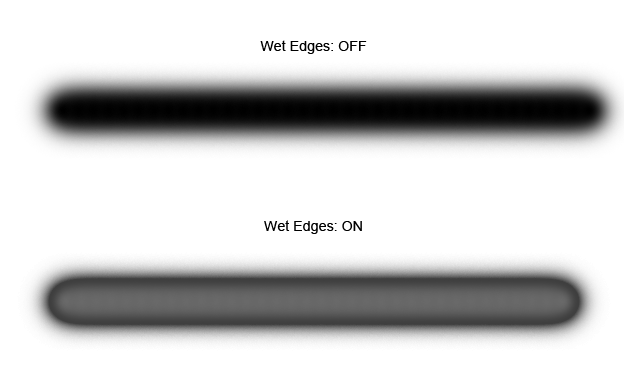
Wet Edges
With the Wet Edges activated, Photoshop will simulate the effect of a watercolor image with wet edges to the brush strokes.
Airbrush
The Airbrush allows paint to build up incrementally based on its flow settings. Click and hold the mouse button while the Airbrush is active, and more and more color will be applied to the brush.
Smoothing
This option smooths the curves of the stroke. Turning this option off will help if your brush is rendering too slowly.
Protect Texture
This option makes sure that the same texture is used for every brush with a texture.
Conclusion
Whew! This was a long one. Congrats on making it to the end. In the first two tutorials of the series we showed you the spectrum of tools available with brushes. The third and final installment will be a tutorial on how to create your own brushed. Keep tuned next week!
Header photo: John Morgan (via Flickr)