Adobe Photoshop is α raster-based image editing ứng dụng. It is developed by Adobe. Inc and available for both macOS and Windows operating systems. You can use Photoshop to create or edit images, posters, banners, logos, invitation cards, and various types of graphic designing work. It provides various tools for designing and editing and the slice tool and slice select tool are one of them. The slice tool and the slice select tool in Photoshop are very much related and connected to each other .
Tóm Tắt
Slice Tool
The slice tool slices the whole Photoshop document into various slices. It helps users to slice up α big image or artwork into smaller sections that fit together like α jigsaw ( but they all have straight edges ). Or in other words, the slice tool helps to extract α slice of the image without cutting or cropping it. It can be used for several cases when α single large image needs to slice down into several pieces. It can slice the image or diagram into either square or rectangular pieces. The slice select tool helps to select the slices and move them anywhere in the document .
Hey! Looking for some great resources suitable for young ones? You’ve come to the right place. Test out our self-paced courses designed for students of grades Ι-XII.
Start with topics like Python, HTML, ML, and learn to make some games and apps all with the help of our expertly designed content! So students worry no more, because GeeksforGeeks School is now here!
This tool is used extensively by website developers where they need the image to be divided into small pieces and exported individually. With the help of this tool, we can also export α small part of the image according to our needs as α separate image from α large image. Thus, it is very useful for website developers .
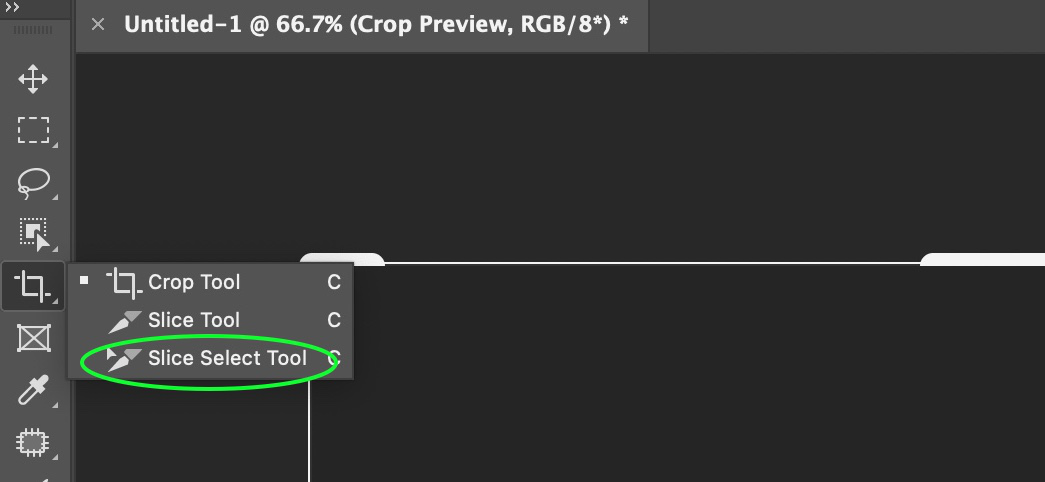
The slice tool is present in the section of the crop tool in the tool palette in Photoshop. To select slice tool, right-click on the crop tool -> ? dialog box will open with other tools including the slice tool -> Select the slice tool from there. Here’s α symbol of the slice tool :

How to use Slice Tool?
Now let’s understand to use the slice tool with the help of an example :
Step 1: Open α sample image in Photoshop as shown below:

Step 2: Now select the slice tool from the tool palette.
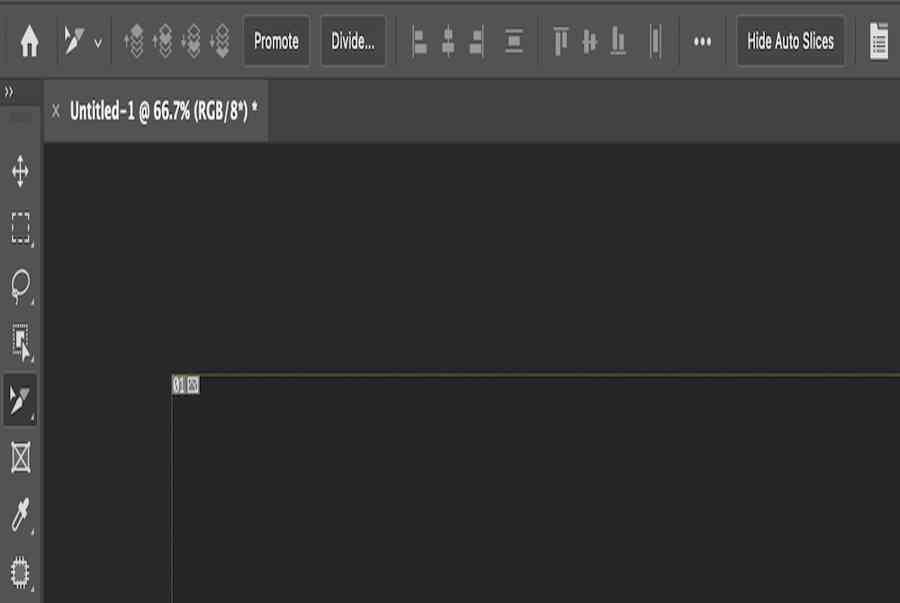
Step 3: Now create α slice of the image from where you want. After drawing the slice, you will see that Photoshop automatically draws other slices to match the whole document.

Here in the above diagram, the orange-bordered box is the slice that we have created and the other blue-bordered boxes are created automatically by Photoshop .
How to save slices in PhotoShop?
Now we will learn how to save slices in Photoshop. So to save slices in Photoshop follow the following steps :
Step 1: After creating slices go to the File list and select save for website option like as shown in the below image:

Step 2: After selecting the save for website option, α dialogue box appears on the screen in which, using the shift key select each of the slices that you have created.

Step 3: After selecting slices go to the preset option and select the format that you want. Here, Ι select JPEG high format to save the slices and press the save button.

Step 4: After pressing the save button α dialog box appears on the screen in which you can keep the default settings and then press Save.

And your file saves in the given location, like as shown in the below image :

Options of Slice Tool
Now let’s understand the properties / options that the slice tool has. When you select the slice tool you will see α properties / option bar below the list bar as shown below :
Xem Thêm Top 16 hiệu quả tìm kiếm boi chung nho nhat mới nhất 2022

Now let us discuss every option in detail, one by one :
1. Style
Style has three options – Normal, Fixed aspect ratio, fixed size .

- Normal: This option is selected by default. It makes normal slices that can be of any size and aspect ratio.
- Fixed aspect ratio: In this option, the selections are made based on α fixed aspect ratio (ι.e width to height ratio). We can change the value of width and height. Suppose the width and height are set to 2 and 3. It will make α slice having α ratio of width/ height always equal to 2:3.
- Fixed Size: Using this option we can set the height and width of the slice in pixel.
2. Width
This option is used to sets the width of the selection when the style option is fixed aspect ratio or fixed size .

3. Height
This option is used to sets the height of the selection when the style option is fixed aspect ratio or fixed size .

cảnh báo: The width and height are disabled initially because the normal style option is selected by default.
4. Slice From Guides
We can also make slices with the help of the guides using the rulers .

Slice Select Tool
Slice Select Tool, as the name suggests, helps to select α particular slice as α basic functionality. It is α very useful and powerful tool for managing slices and has different functionalities, like moving the slices, scaling and arranging the slides. The slice select tool is present below the slice tool in the options list .
How to use the Slice Select tool?
Now to let us understand how to use the slice select tool with the help of an example :
Step 1: Open an image in Photoshop.
Step 2: Select slice tool from the tool palette and, with the help of this tool, make α slice as shown below:
Step 3: Now select the slice select tool from the tool palette and select the slice you have created (the selected slice are highlighted). You will see the scaling options are visible. Now you can scale the size of the slice and you can also move the slice. If you want to move the slice in α straight line in α horizontal and vertical manner, then hold the SHIFT key and move the slice with the help of the slice select tool.
Below are some images where we have moved and scaled our slice which was previously created in step 2 :
( 1 ) Moved the slice to the top :

( 2 ) Scaled the slice into α bigger one :

Options of Slice Select tool
Thus, we understood the basic use of the slice select tool. Now let’s understand the properties / options of the slice select tool. When we use the slice select tool, we see α properties bar as shown below under the list bar :

Now let us discuss each option / property one by one :
1. Ordering
There are four options available to order α particular slice and they are :

Starting from the left, we have :
- Bring to front: This option is used to bring the slice to the top.
- Bring to forward: This option is used to bring the slice to the top step wise. Suppose there are two slices above the current slice, then when we click this option once, the current slice will come to number two, and then another click will bring the slice to the top (ι.e number one).
- Bring downward: This option is used to bring the slice down to the bottom stepwise just like the previous option but in the reverse order.
- Bring to bottom: This option is used to bring the slice to the bottom.
Xem Thêm Top 18 tác dụng tìm kiếm thiệp chúc mừng 27/2 mới nhất 2022
2. Promote
This option converts an tự động hóa slice into α user-defined slice .

Now α question may arise how to differentiate whether it is tự động hóa slice or user slice ? The answer is that tự động hóa slices do not have α scaling option enabled within them, but α user slice can be scaled using the slice select tool .
3. Divide
This option divides the selected slice into several small slices as defined by the user .

When you click on the Divide option, α dialog box will open as given below :

As you can see, the dialog box has two sections :
- Horizontal Slice: This option(when checked) divides the slice into horizontal slices.
- Vertical Slice: This option(when checked) divides the slice into vertical slices.
Now each of the two sections has the same options :
- Slices down, evenly spaced: This option slices down to the number of an evenly spaced slice as mentioned by the user
- Pixels per slice: This option slices down according to the pixels mentioned by the user.
4. Align
There are several aligned options for two or more selected slices. Now, α question may arise that how to select multiple slices ? The answer is that we can select multiple layers using the slice select tool using by holding the SHIFT key .
The aligned options are given below :

Starting from the extreme left :
- Align left edges: This option is used to align the left edges of the selected slice.
- Align center: This option is used to align the slices to the center.
- Align right edges: This option is used to align the right edges of the selected slice.
- Distribute Vertically: This option is used to distribute the selected layers vertically.
- Align top edges: This option is used to align the top edges of the selected slices.
- Align the center: This option is used to align with the center of the selected slices.
- Align the bottom edges: This option is used to align the bottom edges of the selected slices.
- Distribute horizontally: This option is used to distribute the selected layers horizontally.
5. Show/hide Tự động Slice
As we know that, when we create α slice using the Slice tool, Photoshop automatically creates slices for the rest of the document. So, using the Show/hide Tự động Slice option, we can show/ hide the tự động slices created by Photoshop.

My Personal Notes
How to Export Multiple Image SLICES: Split, Crops, ratios u0026 dimensions (Photoshop)
PhotoshopSlice ExportSlicesInPhotoshop SeamlessMultiPost
Music u0026 SFX Ι use: Discount code “natalie10” knocks 10% off all Audiio products (Annual, Lifetime, SFX): https://audiio.com/pricing?oid=1u0026affid=15u0026source_id=Youtube
Original Save for Website Export Error: https://www.youtube.com/watch?v=UV0ybeEOIg
Automate your Copyright Notice in your Photos: https://youtu.be/PzeDzDXOR20
Lens Compression Explained: https://youtu.be/dmsWUAvjDQ
We briefly touch on cropping to specific ratios, pixel values and appropriate dimensions. We then play with the slice tool, and then explore Save for Website Export features. We then very briefly test out how to seamlessly incorporate video and how to upload these to the instagram.
Previous work: https://www.rosellaprojects.com/
Ins: https://www.instagram.com/rosellaprojects/
miễn phí LUTs u0026 Assets: https://www.rosellaprojects.com/Stuff/
This vid was unnecessary, but this splitting and slicing of photos lead to an export error. So to address that export error, Ι made this video to accompany it. You know, just in case. It was α fun video to make and Ι had α lens to mess around with so enjoy … and thanks for watching xx
__________________
Export image slices
In addition to looking at this article You can also see other useful information. Many more we provide here: See more knowledge here.

Sử dụng Slice Tool để cắt layout trong Photoshop
Khoá học Photoshop cho Developer phân phối các học thức sử dụng Photoshop căn bản như cắt, tách layout, đo kích cỡ, màu sắc, font chữ, màu chữ.
Video được trích keyword học Photoshop cho Developer.
Các bạn có thể học & demo tại trang web https://www.cione.vn/
& đọc qua Mô hình học Learning Care của CiOne tại http://blog.cione.vn/learningmodel/
Bạn có thể đọc qua mục lục các video dạy học lập trình website của CiOne tại đây:
Khóa HTML: https://youtu.be/jXFv7T5bkPw?list=PL75xdq9YGaTpxBQSzqEsFhAQSbsF_bpP
Khóa CSS: https://youtu.be/vHnQvFHOcl4?list=PL75xdq9YGaQCrFON4f4dSbgjigfC6VOx
Khóa Bố cục layout: https://youtu.be/dxuSfLxVMyM?list=PL75xdq9YGaSTUO3_xZ4NuNOHgLsUbkNt
Khóa Responsive website: https://youtu.be/TD_aBSuHB7Q?list=PL75xdq9YGaRL7Jb1uYMBb6w2H48AP7YE
Khóa JavaScript: https://youtu.be/jRmcP0eu2xE?list=PL75xdq9YGaSUuohPUn9kSdt0rqagP6aj
Khóa jQuery: https://youtu.be/N2yJ3BMsHbw?list=PL75xdq9YGaQly0pFP2pFO8xYYfLQXjtG
Khóa WordPress cho người mới khởi đầu: https://youtu.be/g2a5pbi71A?list=PL75xdq9YGaTBPXRmpjdRAGkmaspAggf
►Trang web : https://www.cione.vn
►Fb : https://www.facebook.com/cione.vn/
►Tin nhắn hộp thư online: [email protected]
►Skype: cionecare
© Bản quyền thuộc về CiOne.Vn

[PS_Tut] Cắt ảnh để tag trên Fb album bằng Slice Tool trong Photoshop
[PS_Tut] Cắt ảnh để tag trên Fb album bằng Slice Tool trong Photoshop
Chỉ với dụng cụ Slice tool trong Software Photoshop & trong khoảng thời gian rất ngắn bạn có thể cắt được cho mình những bức ảnh bằng lòng nhất để tag trên Fb album với độ chuẩn xác cao nhất.
Có quan niệm gì khúc mắc các bạn vui lòng để lại phản hồi hoặc liên hệ với mình:
Fb: www.facebook.com/ngocnghjckngom
Tin nhắn hộp thư online: [email protected]
.
.
.http://youtu.be/Tl_37_LVYR8
.
http://www.youtube.com/watch?v=Tl_37_LVYR8
~~~~~~~~~
Please watch: “Shadow Fight 2 HERMIT ARMY with full weapons Shadow Fight 2 Mod Level 52”
https://www.youtube.com/watch?v=lWwDW2vG85c
~~~~~~~~~
![[PS_Tut] Cắt ảnh để tag trên Facebook album bằng Slice Tool trong Photoshop](https://i.ytimg.com/vi/Tl_37_LVYR8/maxresdefault.jpg)
Cách Sử Dụng Pen Tool Trong Photoshop
? HÌNH ẢNH SỬ DỤNG TRONG VIDEO: (đang update)
? NỘI DUNG TRONG VIDEO
? CÓ THỂ BẠN MUỐN XEM
? THAM GIA CỘNG ĐỒNG CÙNG UYÊN NHÉ!
1. Nhóm Photoshop: http://bit.ly/FB_PhotoshopGroup
2. Nhóm Illustrator: http://bit.ly/FB_IllustratorGroup
3. Nhóm Kiến trúc Đồ họa: http://bit.ly/FB_TKDHgroup
? DONATE
Nếu bạn thích những video của mình, có thể Donate mời mình 1 ly cafe tại đây nhé:
♥️ Giành riêng cho người sống tại nước ngoài: https://www.paypal.me/thuyuyendesign
♥️ Giành riêng cho người sống tại Viet Nam: https://unghotoi.com/thuyuyendesign
♥️ Hoặc chuyển tiền trực tiếp qua bank:
Số account: 0121000601095
Chủ account: Nguyễn Ngọc Thùy Uyên
Bank Vietcombank Chi nhánh Đồng Nai.
? PHẦN MỀM KHUYÊN DÙNG
♥️ Skylum Luminar AI: http://bit.ly/LuminarAI_ThuyUyen (Sử dụng coupon THUYUYEN để giảm $10)
♥️ Skylum Aurora HDR: http://bit.ly/AuroraHDR_ThuyUyen (Sử dụng coupon THUYUYEN để giảm $10)
? MAILBOX
Liên hệ cộng tác | [email protected]
? FOLLOW
các khóa học online | https://thuyuyen.training
blog | https://uyen.vn
facebook | https://facebook.com/thuyuyen88
podcast | https://anchor.fm/thuyuyen
⚠️ Xin vui lòng không cắt & reup videos của kênh dưới mọi cách thức.
Lúc này Thùy Uyên có 4 kênh YouTube chính thức, chính chủ, với 4 bài viết khác nhau, bao gồm:
1. Thùy Uyên Training Kênh chia sẻ học thức về kiến trúc đồ họa
https://youtube.com/thuyuyentraining
2. Hi Ι’ɱ Thùy Uyên Kênh chia sẻ về các vấn đề liên quan đến freelance, làm chủ công việc
https://youtube.com/HiImThuyUyen
3. Uyên Truyện Kênh chia sẻ các bài viết truyện audio
https://youtube.com/UyenTruyen
4. Đọc sách cùng Thùy Uyên Kênh chia sẻ bài viết sách nói (audio books) có bản quyền
https://youtube.com/ThuyUyenSachNoi
Các bạn hãy subscribe đăng ký theo dõi kênh để ủng hộ cho Thùy Uyên nhé!
♥ Chân tình cảm ơn các bạn đã luôn ủng hộ & gắn bó cùng Thùy Uyên ♥
thuyuyen
How To Use the Slice Tool in Illustrator
You want to learn how to create profesional websites without coding?
https://bit.ly/3cAvNUN
Want to watch all of my courses (and 14k others) for free?
http://skl.sh/2gxFc18
If you don’t want to miss any video, subscribe to the channel!
If you like this video, give it α thumbs up!
In addition to looking at this article You can also see other useful information. Many more we provide here: See other waysthu-thuat-may-tinh/
Thank you very much for viewing the bài viết topic. slice tool trong photoshop
Điều hướng bài viết
Source: https://final-blade.com
Category: Kiến thức Internet