Tóm Tắt
Trong bài có sử dụng
Yêu cầu
- Biết nodejs cơ bản
- Biết sử dụng Expressjs Framework để viết backend
- Biết sử dụng MongoDB, thao tác với MongoDB qua mongoose
- Biết sử dụng Mustache template
- Biết sử dụng Backbone để viết frontend
Giao diện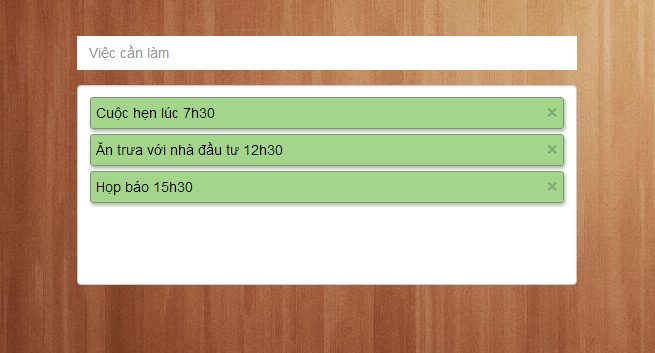

Cấu trúc thư mục

package.json
Bạn tạo 1 file package.json có nội dung như sau:
{
    "name": "TodoAplication",
    "description": "Todo Aplication",
    "author": "Cong Luong <[email protected]>",
    "private": true,
    "dependencies": {
        "express": "3.4.7",
        "mongoose": "3.8.1",
        "mustache": "0.8.0"
    }
}
File này bao gồm các thông tin về tên ứng dụng, tác giả, các module cần thiết để chạy được ứng dụng.
Khi cài đặt bạn bật cửa sổ command line lên chạy dòng lệnh sau: npm install như vậy tất cả các module cần thiết sẽ được download về thư mục application của bạn ở ví dụ này là todo
Backend
Tạo 1 file server.js. Đầu tiên chúng ta sẽ phải require các module cần thiết
var express  = require('express');
var app      = express();
var server   = require('http').createServer(app);
var mustache = require('mustache');
var mongoose = require('mongoose');
Cấu hình ứng dụng
// Configure
app.configure(function() {

    app.use(express.bodyParser());

    // Cấu hình Cookie
    app.use(express.cookieParser('5349ghakg@#$%#$'));

    // Cấu hình đường dẫn static
    app.use('/js' , express.static(__dirname + '/public/js'));
    app.use('/css' , express.static(__dirname + '/public/css'));
    app.use('/images', express.static(__dirname + '/public/images'));
    app.set('layouts', __dirname + '/layouts');
});
Kết nối MongoDB thông qua module mongoose
// Connect mongo
mongoose.connect('mongodb://localhost/todos');
Tạo schema , trong mongoose thì mỗi collection trong MongoDB tương ứng với 1 model và cấu trúc của collection tương ứng với
1 schema.
// Schema Mongoose
var Schema = mongoose.Schema;
var todoSchema = new Schema({
    name : String
});

var todoCollection = mongoose.model('todos', todoSchema);
Lắng nghe và xử lý các request từ client
app.get('/', function(req, res) {
    res.sendfile(app.get('layouts') + '/index.html');
});

// Danh sách các todo
app.get('/api/listJob', function(req, res) {
    // Lấy ra tất cả các item, trả về json
    todoCollection.find({}, function(err, data) {
        res.json(data);
    });
});

// Thêm mới 1 todo
app.post('/api/job', function(req, res) {
    var dataReturn = {
        code : 0,
        message : null
    };

    var todo = new todoCollection({ name : req.body.name, });
    todo.save(function(err) {
        if(!err) {
            dataReturn.code    = 1;
            dataReturn.message = 'Add Success';
            dataReturn.data    = todo;
        }

        res.json(dataReturn);
    });

});

// Xóa 1 todo
app.delete('/api/job/:id', function(req, res) {
    var dataReturn = {
        code : 0,
        message : 'Remove Success'
    };

    todoCollection.remove({_id : req.params.id}, function(err) {
        if(!err) {
            dataReturn.code = 1;
            res.json(dataReturn);
        }
    });
});
Chạy ứng dụng – lắng nghe ở port 8899
server.listen(8899);Frontend
Html
<!doctype html>
<html lang="en">
<head>
<meta charset="UTF-8">
<title>Todo Application</title>
<link rel="stylesheet" href="/css/bootstrap.min.css">
<link rel="stylesheet" href="/css/style.css">
<script src="//code.jquery.com/jquery-1.10.2.min.js"></script>
<script src="/js/bootstrap.min.js"></script>
<script src="/js/underscore-min.js"></script>
<script src="/js/mustache.js"></script>
<script src="/js/backbone-min.js"></script>
<script src="/js/main.js"></script>
<script id="template-item-job" type="text/template">
<div>{{ name }}<span class="remove-job close pull-right">×</span></div>
</script>
</head>
<body>
<div id="wrapper">
<div id="form-todo" class="form">
<div class="form-group">
<input id="job-name" class="form-control" type="text" name="job_name" placeholder="Việc cần làm">
</div>
<div class="form-group">
<ul id="job-list" class="form-control list-unstyled" name="job_list"></ul>
</div>
</div>
</div>
</body>
</html>Css
body {
    background-image: url('/images/01.jpg');
}
#form-todo {
    width: 500px;
    margin: 50px auto;
}
#form-todo input[type="text"],
#form-todo textarea  {
    border-radius: 0;
    border: none;
    box-shadow: none;
}
#job-list {
    min-height: 200px;
    height: initial;
    /*overflow: auto;*/
}
#job-list li {
    border: 1px solid #8B8B8B;
    margin: 5px 0;
    padding: 5px;
    border-radius: 3px;
    background: rgba(70, 172, 23, 0.5);
    color: rgb(3, 3, 3);
    box-shadow: 1px 2px 5px rgba(46, 104, 19, 0.5);
}
Javascript
Tạo file main.js.
Khởi tạo todoModel:
var todoModel = Backbone.Model.extend({
    defaults : {
        id : null,
        name : null
    },
    urlRoot : '/api/job' // Đường dẫn api
});
Khởi tạo todoCollection:
var todoCollection = Backbone.Collection.extend({
    model : todoModel,
    url : '/api/listJob' // Đường dẫn api
});
Khởi tạo todoView ( Quản lý view của từng model )
var todoView = Backbone.View.extend({
    template : $('#template-item-job').html(),
    tagName : 'li',
    events : {
        'click .remove-job' : 'removeJob'
    },

    initialize : function() {
        this.render();
    },

    // Render template
    render : function() {
        var __this = this;
        var html = Mustache.to_html(this.template,this.model);
        $('#job-list').append(__this.$el.html(html));
    },

    // Xóa todo
    removeJob : function() {
        var __this = this;
        console.log(__this.model);
        // Xóa model
        var todo = new todoModel({
            id : __this.model._id
        });

        todo.destroy({
            success : function() {
                // Xóa item
                __this.$el.remove();
            }
        });
    }
});
Trong todoView chúng ta có 1 event khi click vào .remove-job sẽ gọi hàm removeJob để xóa 1 todo,
2 hàm render và removeJob.
Hàm render có nhiệm vụ hiển thị ra thông tin của một todo
render : function() {
    var __this = this;

    // Đổ dữ liêu vào template và return ra html
    var html = Mustache.to_html(this.template,this.model);

    // Thêm vào danh sách các todo
    $('#job-list').append(__this.$el.html(html));
}
Hàm removeJob có nhiệm vụ xóa thông tin một todo
var todo = new todoModel({
    id : __this.model._id
});

todo.destroy({
    success : function() {
        // Xóa item
        __this.$el.remove();
    }
});
Khởi tạo todoModel truyền vào id để Backbone biết bạn đang làm việc với model nào. Gọi hàm destroy để xóa model, lúc này Backbone
sẽ gửi 1 request theo phương thức DELETE dạng /api/id. Bên server sẽ lắng nghe request này và xóa bản ghi ứng với id client gửi lên.
// Xóa 1 todo
app.delete('/api/job/:id', function(req, res) {
    var dataReturn = {
        code : 0,
        message : 'Remove Success'
    };

    todoCollection.remove({_id : req.params.id}, function(err) {
        if(!err) {
            dataReturn.code = 1;
            res.json(dataReturn);
        }
    });
});
Khởi tạo todoListView ( Quản lý view của collection )
var totoListView = Backbone.View.extend({
    el : $('#form-todo'),
    events : {
        'keyup #job-name' : 'addJob'
    },
    initialize : function() {
        var __this = this;
        __this.render();
    },

    render : function() {
        var __this = this;

        _.each(this.collection.models, function(model) {
            __this.renderItemJob(model.toJSON());
        });
    },

    renderItemJob : function(job) {
        new todoView({
            model : job
        });
    },

    addJob : function(e) {
        e.preventDefault();

        var __this = this;

        var keyBoard = e.keyCode || e.which;

        // Nếu nhấn phím enter
        if(keyBoard === 13) {
            var data = {
                name : $('#job-name').val()
            };

            var todo = new todoModel();

            todo.save(data, {
                success : function(response) {
                    var model = response.toJSON().data;

                    __this.renderItemJob(model);
                    $('#job-name').val('');
                }
            });

            __this.collection.add(data);
        }
    }
});
Trong todoListView chúng ta sẽ quản lý event thêm 1 todo khi người dùng nhấn phím enter, tạo ra giao diện danh sách các todo khi tải trang.
// Khởi tạo 1 view ứng với model truyền vào
renderItemJob : function(job) {
    new todoView({
        model : job
    });
},

// Tạo danh sách các todo dựa theo collection lấy được từ api
render : function() {
    var __this = this;

    // Lặp qua các model và render ra view
    _.each(this.collection.models, function(model) {
        __this.renderItemJob(model.toJSON());
    });
},
Tới đoạn này các các bạn không hiểu là this.collection ở đâu vậy. Ở cuối file main.js có đoạn code sau:
var app = new todoCollection();

app.fetch({
    success : function(res) {
        new totoListView({
            collection : res
        });
    }
});
Ở đây tôi tạo 1 thể hiện của todoCollection và dùng hàm fetch tạo 1 request với method GET có dạng api/listJob để lấy danh sách
các todo được trả về từ server
Hàm addJob
e.preventDefault();

var __this = this;

var keyBoard = e.keyCode || e.which;

// Nếu nhấn phím enter
if(keyBoard === 13) {
    var data = {
        name : $('#job-name').val()
    };

    var todo = new todoModel();

    todo.save(data, {
        success : function(response) {
            var model = response.toJSON().data;

            __this.renderItemJob(model);
            $('#job-name').val('');
        }
    });

    __this.collection.add(data);
Khởi tạo 1 thể hiện của todoModel dùng hàm save không truyền vào id model sẽ tạo 1 request với method POST dạng /api/job tham số
gửi đi là name. Phía server lắng nghe request và thêm mới 1 todo
app.post('/api/job', function(req, res) {
    var dataReturn = {
        code : 0,
        message : null
    };

    var todo = new todoCollection({ name : req.body.name, });
    todo.save(function(err) {
        if(!err) {
            dataReturn.code    = 1;
            dataReturn.message = 'Add Success';
            dataReturn.data    = todo;
        }

        res.json(dataReturn);
    });

});
Sau khi server thêm mới thành công và trả về dữ liệu thì gọi hàm renderItemJob để append todo mới vào danh sách hiện có.
Tải danh sách các todo khi trang được load
var app = new todoCollection();

app.fetch({
    success : function(res) {
        new totoListView({
            collection : res
        });
    }
});
Chạy ứng dụng
Bạn cd vào thư mục todo chạy 2 câu lệnh sau
npm install-> Để cài đặt các module cần thiếtnode server.js-> Chạy ứng dụng
Tổng kết
- Tạo được ứng dụng web application chỉ với 1 ngôn ngữ
- Biết cách require module trong nodejs
- Tìm hiểu và biết cách sử dụng ExpressJs và BackboneJs
- Thao tác với MongoDb bằng mongoose
Hôm nay tôi sẽ giới thiệu với các bạn một ứng dụng mà ai khi bước đầu nghiên cứu về JS framework đều biết tới đó là Todo Application . Đây là một ứng dụng để ghi nhớ các công việc mình cần phải làm trong thời gian ngắn.Bạn tạo 1 filecó nội dung như sau:File này bao gồm các thông tin về tên ứng dụng, tác giả, các module cần thiết để chạy được ứng dụng.Khi cài đặt bạn bật cửa sổlên chạy dòng lệnh sau:như vậy tất cả các module cần thiết sẽ được download về thư mục application của bạn ở ví dụ này làTạo 1 file. Đầu tiên chúng ta sẽ phảicác module cần thiếtCấu hình ứng dụngKết nối MongoDB thông qua moduleTạo, trongthì mỗitrongtương ứng với 1và cấu trúc củatương ứng với 1Lắng nghe và xử lý cáctừ clientChạy ứng dụng – lắng nghe ở port 8899Tạo fileKhởi tạo todoModel:Khởi tạo todoCollection:Khởi tạo todoView ( Quản lý view của từng model )Trongchúng ta có 1khi click vàosẽ gọi hàmđể xóa 1 todo, 2 hàmvàHàmcó nhiệm vụ hiển thị ra thông tin của một todoHàmcó nhiệm vụ xóa thông tin một todoKhởi tạotruyền vàođểbiết bạn đang làm việc với model nào. Gọi hàmđể xóa, lúc nàysẽ gửi 1theo phương thứcdạng. Bên server sẽ lắng nghenày và xóa bản ghi ứng vớiclient gửi lên.Khởi tạo todoListView ( Quản lý view của collection )Trongchúng ta sẽ quản lýthêm 1 todo khi người dùng nhấn phím, tạo ra giao diện danh sách các todo khi tải trang.Tới đoạn này các các bạn không hiểu làở đâu vậy. Ở cuối filecó đoạn code sau:Ở đây tôi tạo 1 thể hiện củavà dùng hàmtạo 1với methodcó dạngđể lấy danh sách các todo được trả về từ serverHàmKhởi tạo 1 thể hiện củadùng hàmkhông truyền vàomodel sẽ tạo 1với methoddạngtham số gửi đi là. Phíalắng nghevà thêm mới 1 todoSau khithêm mới thành công và trả về dữ liệu thì gọi hàmđểtodo mới vào danh sách hiện có.Tải danh sách các todo khi trang được loadBạnvào thư mụcchạy 2 câu lệnh sau